
Add a TECR
- Navigate to Environment > Requests.
- Click the TECR tab.
- Click
 . To edit an exiting TECR, see Edit a TECR.
 - The ‘TECR’ pop-up displays. Fill in the fields as follows:
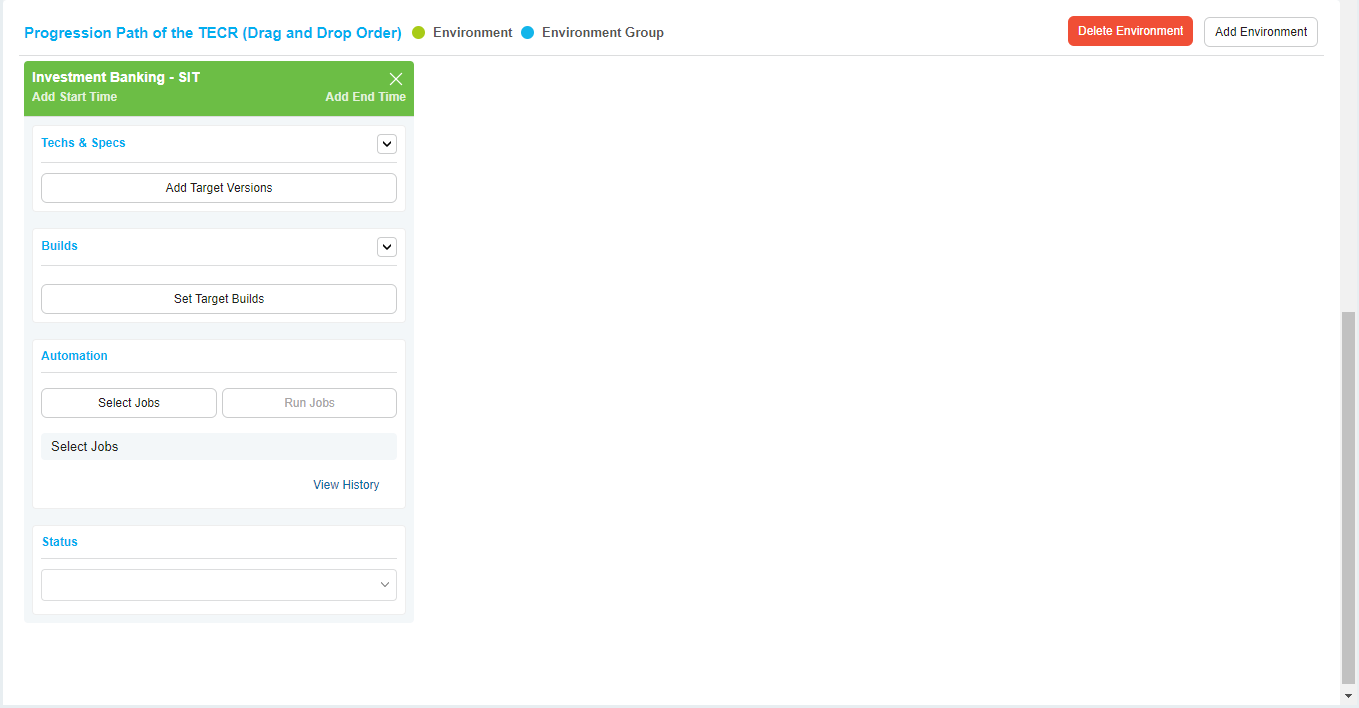
‘Progression Path of the TECR’ section
- Click
 .
. - On the ‘Add Environment’ pop-up select the Environment or Environment Group. If you do not find the Environment/Group, ensure that the required permission. Administrators can prevent you from viewing and booking Environments and Environment Groups outside your Portfolio Association by selecting the My Portfolio Association checkbox for the Restrict Site-Wide View of Environments user permission.
- Click
 .
. - The Environment/Group displays on the TECR pop-up. To add more Environment/Groups repeat the above steps.
- To delete an environment, click
 .
.
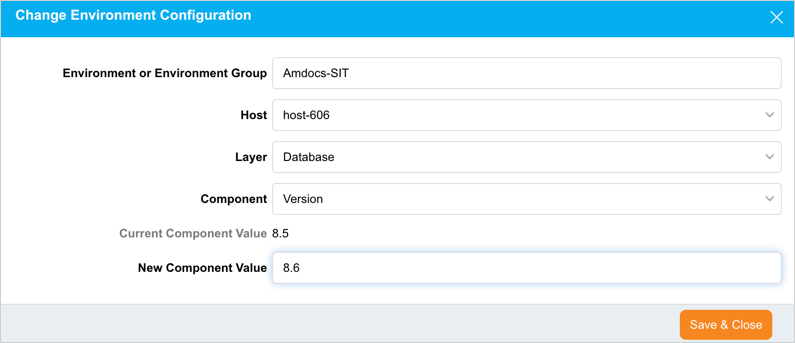
Update the Layer
Manually update Environment Components via TECR. For example, change the version number from 1.1 to 1.2:
- Click
 on each Environment.
 - Select the Host from the drop-down menu.
- Select the Layer from the drop-down menu.
- Select a layer from the Component drop-down menu.
- Type a New Component value, which will become the new version number.
- Click .
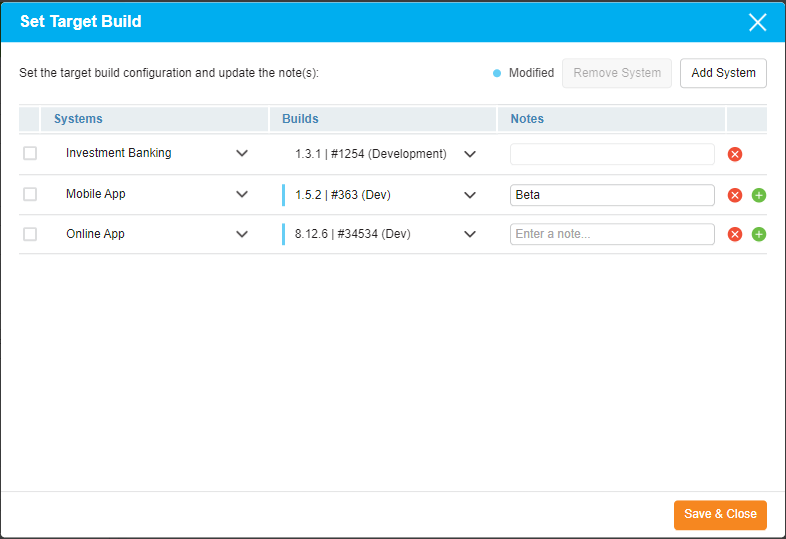
Set Target Builds:
You can set the Target Build configuration for the System and multiple Subsystems for a single Environment as part of a TECR.
- Click
 on each Environment
 - Click
 to add a new row for each System or SubSystem
 - Select the Build from the drop-down menu.
- Update the Note field
- Click .
If you want to configurate multiple versions of a single Subsystem running on a Environment you can add multiple Build and Notes.
To add additional Build and Notes click ![]() icon
icon
To remove an existing Build and Note, click the ![]() icon next to the relevant Build and Note
icon next to the relevant Build and Note
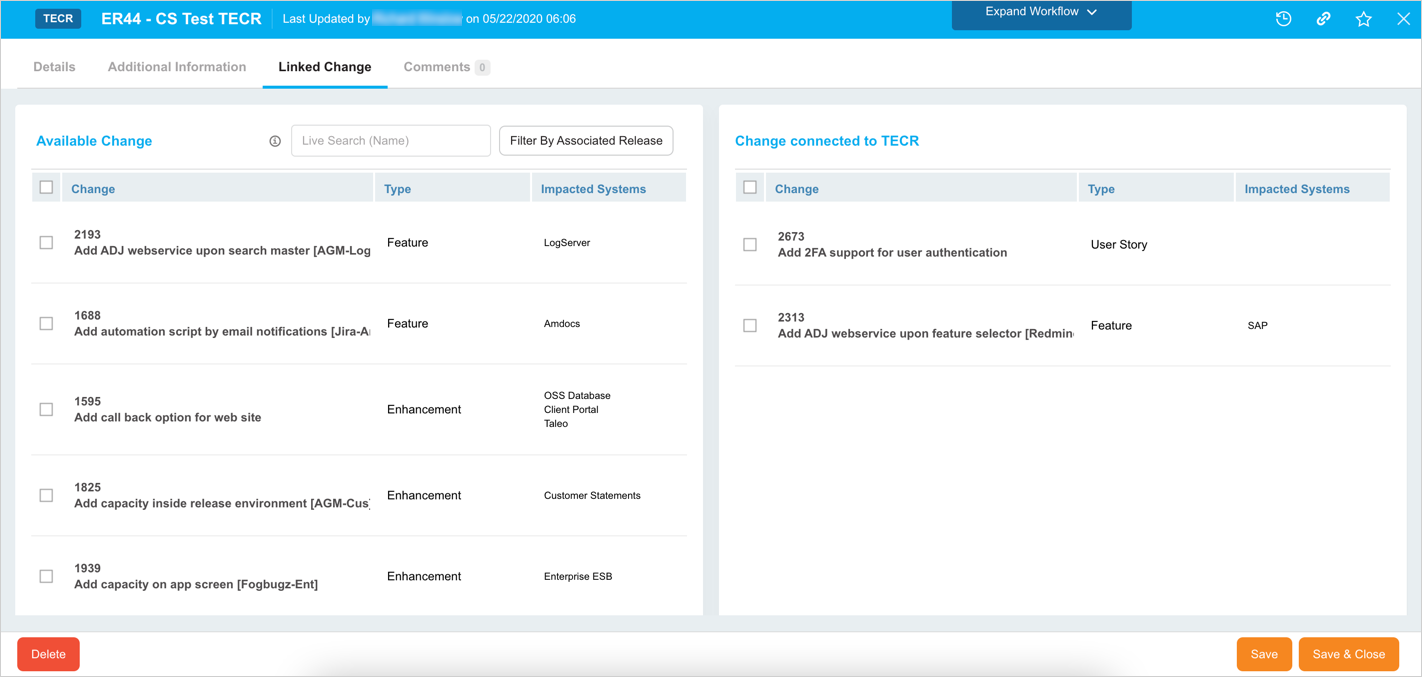
The Comments tab allows you to add a comment and answer other users’ comments.
- Add a comment: Type your comment into the Enter Comment Here field and click
 .
. - Edit a comment: Click Edit on the comment. Then edit the comment and click
 .
. - Delete a comment: Click Delete on the comment. Then click
 on the confirmation prompt.
 - Reply to a comment: Click Reply and enter your reply comment in the Enter comment here field and click
 .
.

Click ![]() once you have enter the required details.
once you have enter the required details.
A new TECR is created and will be available on the grid.
More Information
TECR Workflow
Workflows allow administrators to control the way TECRs are processed. Using the TECR Status Customization, administrators can set:
- The sequence of TECR Statuses for each TECR Type.
- The User Groups or User Roles that have the permission to update each TECR Status.
For instance, a TECR Type might have a workflow based on the TECR Statuses: Draft > Active > Complete. All User Roles might have permission to change the TECR Status from Draft to Active (using the Status drop-down menu) but only a ‘Manager’ User Role might have permission to change the TECR Status from Active to Complete. This workflow allows managers to check each TECR before it is completed.
If the Enable TECR Workflow checkbox is selected in TECR Status Customization, users can click Expand Workflow![]() to view the TECR’s workflow path and see who initiated each status update. Clicking Collapse Workflow
to view the TECR’s workflow path and see who initiated each status update. Clicking Collapse Workflow ![]() hides the workflow.
hides the workflow.

View Audit History
View ‘Audit History’ of a TECR to access the history of the events and updates associated with this TECR. To view the ‘Audit History’, click ![]() at the top-right corner of the pop-up. For more information, see Audit History.
at the top-right corner of the pop-up. For more information, see Audit History.
Copy URL
You can share the URL by clicking ![]() at the top right corner of the TECR pop-up. Then paste the URL into another application or document to be shared. For further information, see Copy URL.
at the top right corner of the TECR pop-up. Then paste the URL into another application or document to be shared. For further information, see Copy URL.
Add to Favourites
You can add a TECR to your Favourites. For this, click on ![]() in the header of the pop-up. For more details, see Favourites.
in the header of the pop-up. For more details, see Favourites.