
Send selected users a regular, scheduled email with the latest version of a Workbook or View as a PNG image. If users click the image, the View or Workbook will open in Plutora Analytics.
Users can create an unlimited number of scheduled emails.
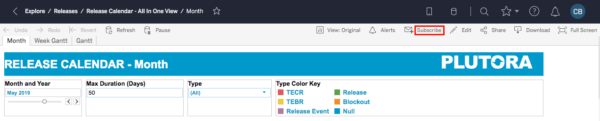
Schedule a Workbook or View
To schedule a View in Plutora Analytics:
- Go to:
- Plutora: Reporting > Analytics.
- Plutora Test: Click Plutora Analytics.

Plutora Analytics will only open if a single instance of Plutora or Plutora Test is open in your browser. If your pop up blocker prompts you when you try to open Plutora Analytics, disable it for the site.
- Open a workbook.
- Click Subscribe.
- Add users who will be sent the scheduled emails:
If the Subscribe Users, Subscribe Users in Groups, and Subscribe me fields are missing or grayed out, you only have permission to subscribe yourself. To subscribe others, move the View or Workbook into a shared folder and try again.- Add individual users:
- Click Add users under Subscribe Users.
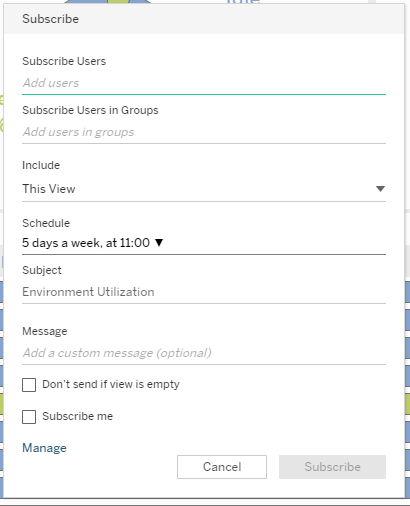
Any number of users can be added to a scheduled email, but they must all have a Plutora account. - Start typing the user’s name and click to select the name when it appears.
- Click Done.
- Click Add users under Subscribe Users.
- Add User Groups:
This feature does not currently work. Instead, select individual users from the Subscribe Users field above.
- Add individual users:
- Select the part of the Workbook or View that will be scheduled from Include:
- This View:
- If tabs are present, only the open tab will be sent.
- The default View only will be scheduled.
- If you are using a non-default View, the default View will be scheduled instead.
- If you are using the default View with some of the filters changed, these filter changes will not be scheduled.
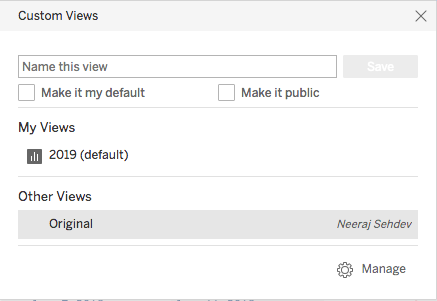
- To create a new default View from your current filters and settings so it can be scheduled:
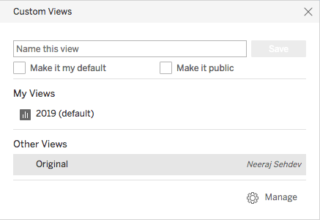
- Click View in the menu.

- Click Name this view and type a name.
- Click to select the Make it my default checkbox.
- Click to select the Make it public checkbox if you want to make the View appear under Other Views for other users.
- Click Save.
- The new default View will appear in the menu and can now be scheduled.

- If you update your default View, other users will not see your changes. To ensure users can see your changes, create a new report.
- Click View in the menu.
- Entire Workbook: Send the default view of all the tabs.
- This View:
- Select a Schedule:
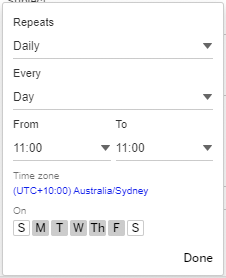
- Click to select when the report will Repeat:
- Hourly.
- Daily.
- Weekly.
- Monthly.
- Click to select the time increment when the report will repeat, Every:
- Two hours.
- Four hours.
- Eight hours.
- Twelve hours.
- Day.
- Click to select the range of hours in a day when a report will repeat, From.
- Click a day of the week (represented by the first or first two letters) when the report will repeat.
- Click Done.
- Click to select when the report will Repeat:
- Type the email subject line in Subject.
- Type the Message that will appear in the body of the emails.
- Click Done.
- Click to select the Don’t send if view is empty checkbox to make sure you are only sent an email if there is something to display.
- Admin users only: Click to select the Subscribe me checkbox if you would like to be included in the scheduled emails.
View and manage your current subscriptions by clicking Manage. - Click Subscribe.


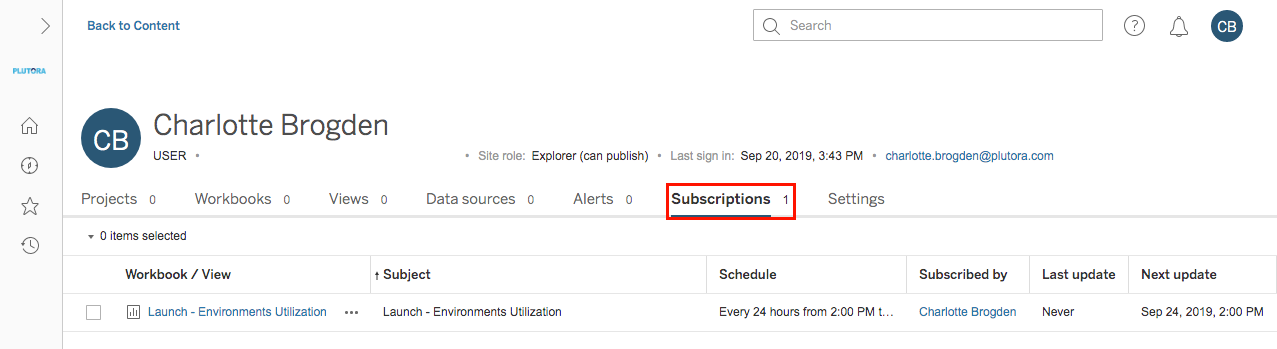
Edit Schedules from the User Menu
A user’s schedules are now listed under, and be updated from, the Subscriptions tab in the User Menu.
- Go to Reporting > Analytics > User Menu > My Content.

- Click the Subscriptions tab.

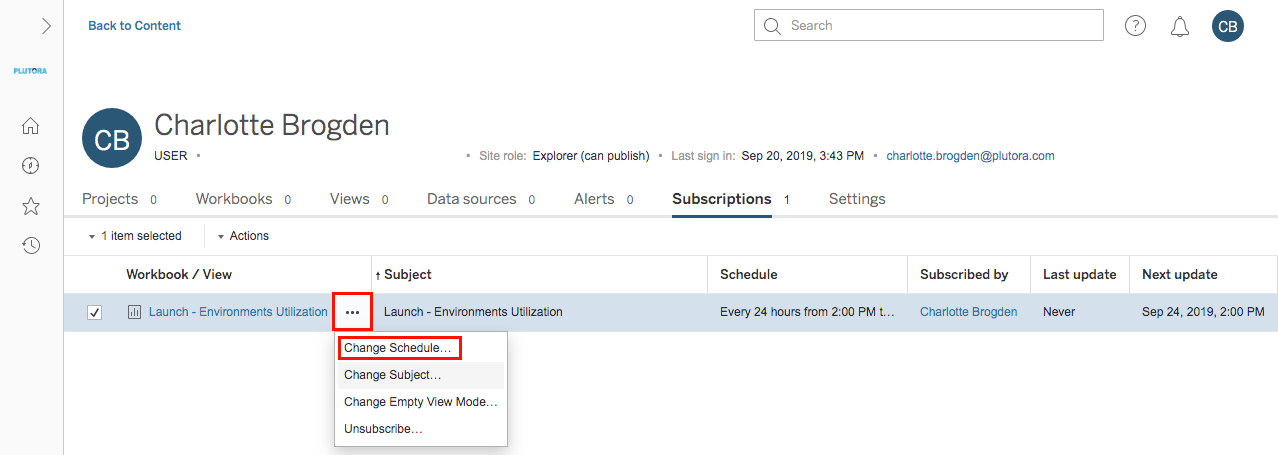
- Click … to edit a schedule then select Change Schedule.

- Change the Schedule:
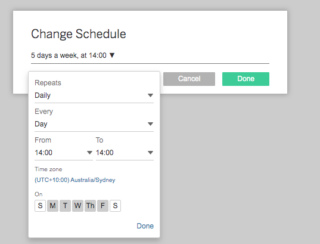
- Click to select when the report will Repeat:
- Hourly.
- Daily.
- Weekly.
- Monthly.
- Click to select the time increment when the report will repeat, Every:
- Two hours.
- Four hours.
- Eight hours.
- Twelve hours.
- Day.
- Click to select the range of hours in a day when a report will repeat, From.
- Click a day of the week (represented by the first or first two letters) when the report will repeat.
- Click Done to close the pop up.
- Click Done again to confirm.
- Click to select when the report will Repeat:


![]()