
Query Builder
Query Builder is a pop up that allows you to add, edit, run, and delete custom search parameters including:
- Private Search Queries: Visible only to the user.
- Public Search Queries: Visible to other users in the organization.
Access Query Builder by clicking ![]() .
.
To manage Public queries, you must have the correct ‘Create/Delete Public Query’ user permission.
Add a query
- To add a query click
 on the top left corner of the page.
 - Query Builder pop up will display. Click each field in the Build Up Your Query panel and select from the drop-down menus or select a date. Fields with a padlock cannot be selected. Administrators can make them viewable using the Custom Fields customization for that page.
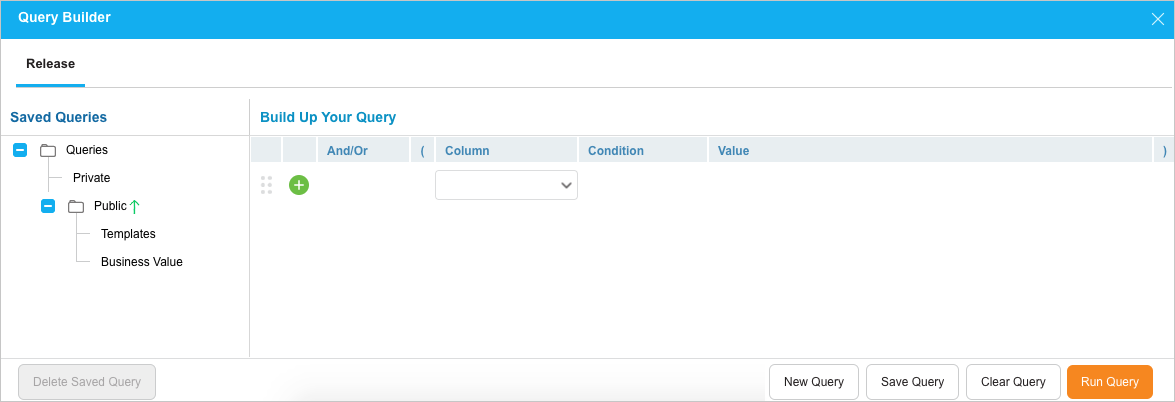
- Click
 to add another line to the query and click X to delete a line from the query.
 - Click
 .
. - Select Private or Public from the ‘Parent’ drop-down menu and type a Filter Name.
- Click
 .
.
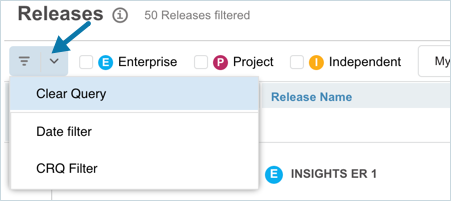
Run a Query
To run a Query click ![]() next to the Query Builder icon on the top left corner of the page. Then select a query from the drop down to run.
next to the Query Builder icon on the top left corner of the page. Then select a query from the drop down to run.
Edit a Query
- To edit a Query, click .
- Query Builder pop up will display. Click on the query that you want to edit on Saved Queries panel.
- The query fields will display in Edit “…” panel. Update the fields as required.
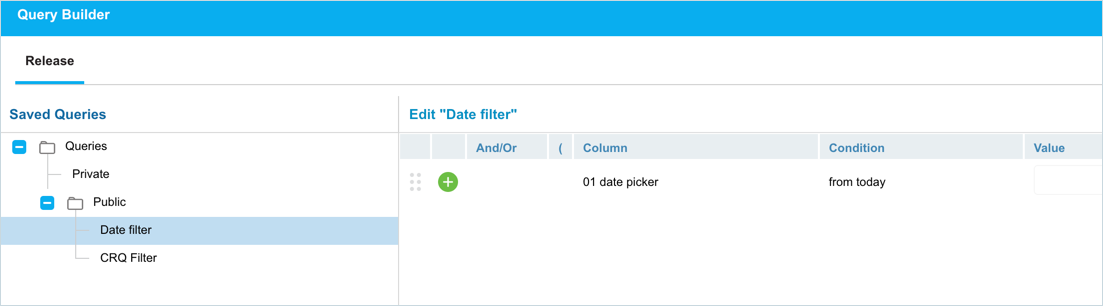
- Click to add another line to the query and click X to delete a line from the query.
- Click .
Clear a Query
When Query Builder is active, the icon changes to ![]() .
.
To clear a Query Builder query and see unfiltered items, Click ![]() next to the Query Builder button and select Clear Query.
next to the Query Builder button and select Clear Query.
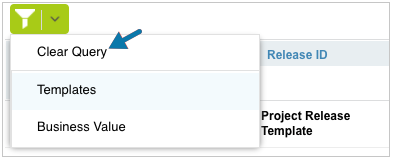
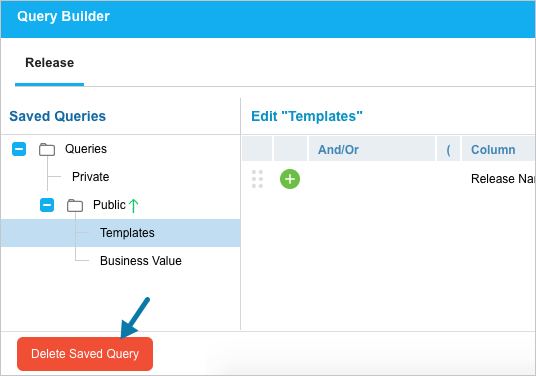
Delete a query
To delete a query, click ![]() from the top left corner to open Query Builder page. Select a query from the Saved Queries column. Then Click
from the top left corner to open Query Builder page. Select a query from the Saved Queries column. Then Click ![]() .
.
Favorite Item
Favorites make records faster to access. You can add a Release, TECR, TEBR, Report, or Release Template as a favorite, then access your Favorite Items by clicking the star icon ![]() in the navigation menu bar.
in the navigation menu bar.
Add Favorite
To add a favourite, open a Release, TECR, TEBR, Report, or a Release Template and click on ![]() in the header of the pop up.
in the header of the pop up.

A message ‘Successfully added to favorites’ will display.
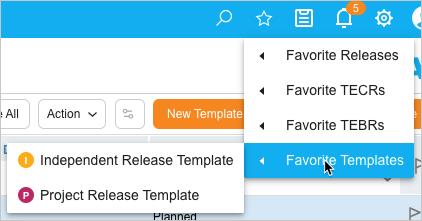
Use Favorites
You can use your favorite item by accessing the Favorite Items on the navigation bar. Click ![]() and hover over one of the following menu items:
and hover over one of the following menu items:
- Favorite Releases.
- Favorite TECRs.
- Favorite TEBRs.
- Favorite Templates.
Click to open the favorite item.
Remove Favorites
To remove a favorite, select and open the favorite item by clicking ![]() on the menu navigation bar. Then click on the
on the menu navigation bar. Then click on the ![]() on the pop up to remove the item from the favorites list:
on the pop up to remove the item from the favorites list:

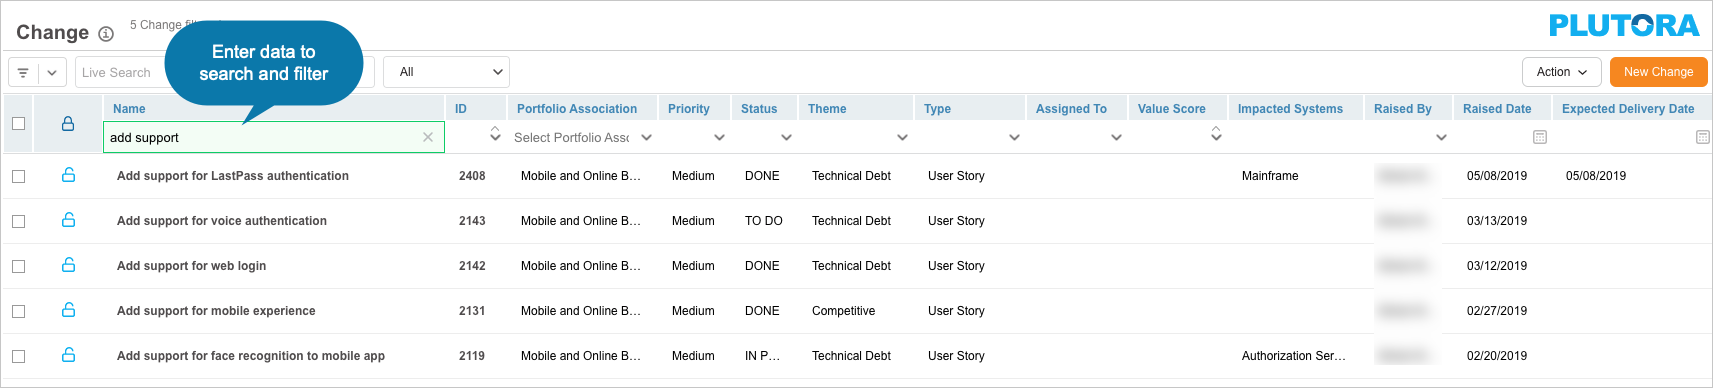
If the grid column filter is a:
- Search field: Type a search term.
- Drop down menu: Click to select a list item.
- Combo box: Click to select one or more checkboxes.
- Date field: Select a date.
Press the Enter key to run the filter. To clear a filter, click ![]() on the filter filed.
on the filter filed.
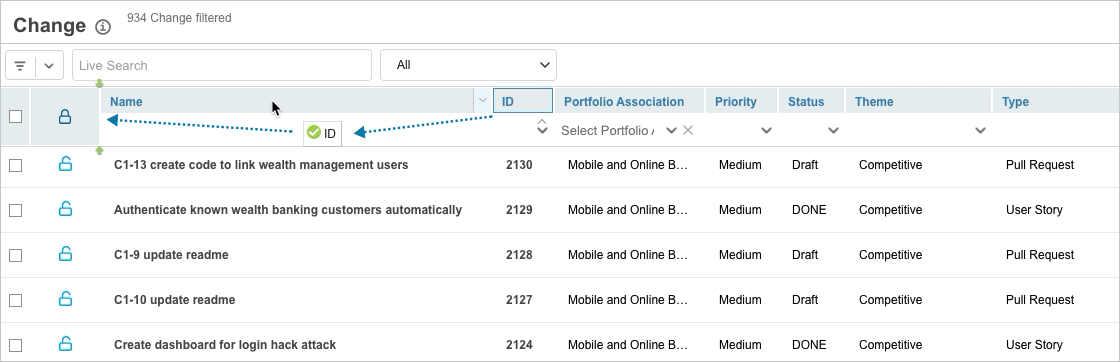
Hide/Unhide columns on the grid
Reorganise your grids on Plutora by hiding /unhiding the columns on a grid. You can hide columns on your grid containing information that you do not need to view. This will reduce the total width of the grid, giving more space for the required columns.
To hide/unhide a column, hover over the column until ![]() is visible. Click on it and select Columns from the drop down. It will display all the columns available on the grid.
is visible. Click on it and select Columns from the drop down. It will display all the columns available on the grid.
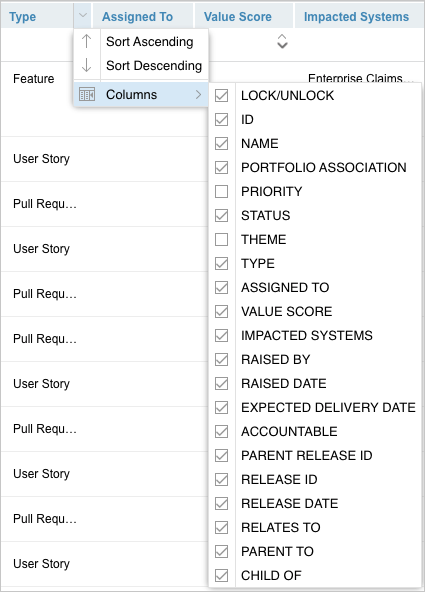
Uncheck/check the columns to hide/unhide them on the grid.
‘Action’ button
The ‘Action’ button is available on almost all the feature grids in Plutora. It provides you with various options including Export to XLS, Bulk Update, Column Selector, Delete, etc. These options vary from one feature to the other. To access the ‘Action’ button, click on ![]() on the top right corner of the page.
on the top right corner of the page.
+New tab on Navigation Menu
The + New link in the navigation menu allows you to open a new record with only two clicks.

The following record types can be created using + New:
- Release:
- Enterprise Release.
- Project Release.
- Independent Release.
- Release From Template.
- Environment:
- TECR.
- TEBR (with or without a Release).
- Environment.
- Environment Group.
- Deployment Plan:
- Master Deployment Plan.
- Deployment Plan.
- PIR:
- PIR Item.
- Other:
- Change.
- System.
- Blockout.
Copy URL to Clipboard
You can share a record’s URL in Plutora by ‘Copy URL to Clipboard’ option. If the URL is accessed by a user who is:
- Not logged into Plutora: Will be redirected to the login page to then view the record.
- Logged into Plutora: Will be able to view and edit the record.
To copy a URL to the clipboard, click ![]() then paste the URL into another application or document to be shared.
then paste the URL into another application or document to be shared.
Audit History
The Plutora Audit History of a record contains a searchable history of the events and updates associated with that record. To view the Audit History of a record, click the Audit History button ![]() at the top-right corner of pop-ups throughout Plutora.
at the top-right corner of pop-ups throughout Plutora.

Clicking ![]() displays the ‘History’ dialog. You can search and filter the history:
displays the ‘History’ dialog. You can search and filter the history:
- Live Search: Enter a parameter or value and press the Enter key.
- Filter: Select one or more of the All, Added, Modified, or Deleted checkboxes
Add Attachments
You can attach URLs and/or Files throughout Plutora. To add a new attachment:
- Click
 .
. - Select Add URL or Add File.
- In the case of a URL, the ‘Add URL’ pop-up displays. Enter the URL in the field and click
 . In the case of a File, select an attachment file and click Open.
The selected URL or file will display in the ‘Attachment’ section.
- To view an attachment, click
 next to the attachment.
 - To delete an attachment, click X next to the attachment.
- To download a file attachment, click
 next to the attachment.