
Blockout Period Types are selected when adding or editing a Blockout Period.

Location of Blockout Period Types
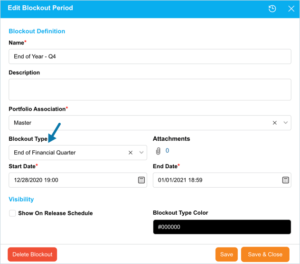
Blockout Period Types are found on the Add New Blockout Period or Edit Blockout Period pop ups when adding or editing a Blockout.
To locate Blockout Period Types:
- Go to Release > Blockouts.
- Click Blockout Name or click New Blockout.
- The Blockout Period Types field is halfway down the pop up.

Add a Blockout Period Type
To add a Blockout Period Type:
- Go to Settings
 > Customization > Releases.
 - Click Blockout Period Type.
- Click Add Field.
- Type the new Blockout Period Type in the Value column.
- Double click the Color column and select a color from the drop-down menu or enter a Hex value.
- Select a Category:
- The Category can be either Not Applicable or Environment Booking.
- Blockout Period Types with the Category Environment Booking are used to:
- Allow better forecasting by displaying time periods that cannot be booked for selected Environments and Environment Groups in the Environment Schedule.
- Environments and Environment Groups are selected when adding or editing a Blockout with the Category Environment Booking.
- Prevent bookings for the selected Environments or Environment Groups during this time period, unless the user has the Book Environments during Blockout permission.
- Allow better forecasting by displaying time periods that cannot be booked for selected Environments and Environment Groups in the Environment Schedule.
- Double click the Icon column and select an icon from the drop-down menu.
- Click to select the Default checkbox to make the item appear by default in the drop-down menu.
- Click Submit.
The yellow Your changes have been saved pop up opens and closes.
If you click away from the Customization page without clicking Submit, your changes will not save.
Edit a Blockout Period Type
To edit a Blockout Period Type:
- Go to Settings> Customization > Releases.
- Click Blockout Period Type.
- Click to select the Blockout Period Type.
- Click Edit Field.
- Edit the Blockout Period Type in the Value field.
- Double click the Color field and select a color from the drop-down menu or enter a Hex value.
- Select a Category:
- The Category can be either Not Applicable or Environment Booking.
- Blockout Period Types with the Category Environment Booking are used to:
- Allow better forecasting by displaying time periods that cannot be booked for selected Environments and Environment Groups in the Environment Schedule.
- Environments and Environment Groups are selected when adding or editing a Blockout with the Category Environment Booking.
- Prevent bookings for the selected Environments or Environment Groups during this time period, unless the user has the Book Environments during Blockout permission.
- Allow better forecasting by displaying time periods that cannot be booked for selected Environments and Environment Groups in the Environment Schedule.
- Double click the Icon column and select an icon from the drop-down menu.
- Click to select the Default checkbox to make the item appear by default in the drop-down menu.
- Click Submit.
The yellow Your changes have been saved pop up opens and closes.
If you click away from the Customization page without clicking Submit, your changes will not save.
Sort Blockout Period Type
Sort Manually
Sorting Blockout Period Types manually changes their order in drop-down menus.
To sort Blockout Period Types manually:
- Go to Settings> Customization > Releases.
- Click Blockout Period Type.
- Hover your mouse cursor over the sort column.
The sort handle (six gray dots) appears.
- Left-click and drag the sort handle to resort the Blockout Period Type.
- Click Submit.
The yellow Your changes have been saved pop up opens and closes.
If you click away from the Customization page without clicking Submit, your changes will not save.
Sort by Column Header
Sorting Blockout Period Types by column header only changes their order on the Customization page.
To sort alphabetically on the Customization page by column header:
- Go to Settings> Customization > Releases.
- Click Blockout Period Type.
- Click a column header.
The Blockout Period Types will revert to their previous order when you click away from the Customization page.
Delete a Blockout Period Type
Deleting a Blockout Period Type will not delete it from Plutora. But it will no longer be available when adding or editing releases.
To delete a Blockout Period Type:
- Go to Settings> Customization > Releases.
- Click Blockout Period Type.
- Click to select the Blockout Period Type.
- Click Delete Field.
- Click Submit.
The yellow Your changes have been saved pop up opens and closes.
If you click away from the Customization page without clicking Submit, your changes will not save.
Enforce Blockout Period Standard Colors Across Plutora
When users can add their own hex color to Blockout Period Types, Plutora will no longer have standard colors for each Blockout Period Type.
To prevent users from adding their own hex color to Blockout Period Types:
- Click to select the Enforce Blockout Period Standard Colors across Plutora checkbox.
- Click Submit.
- Click Yes to confirm.
The yellow Your changes have been saved pop up opens and closes.
If you click away from the Customization page without clicking Submit, your changes will not save.
Update Existing Blockout Periods to Match Standard Colors
Blockout Period Types may have non-standard colors if users have been adding their own hex colors.
To change all non-standard colors back to the standard Blockout Period Type colors:
- Click Update existing Blockout Types to match Standard Colors.
- Click Yes.
![]()