
Add an Environment
To add an Environment:
- Navigate to the ‘Environment’ page.
- Click
 .
. - The ‘Environment’ pop-up displays. Fill in the fields as follows to create a new Environment.
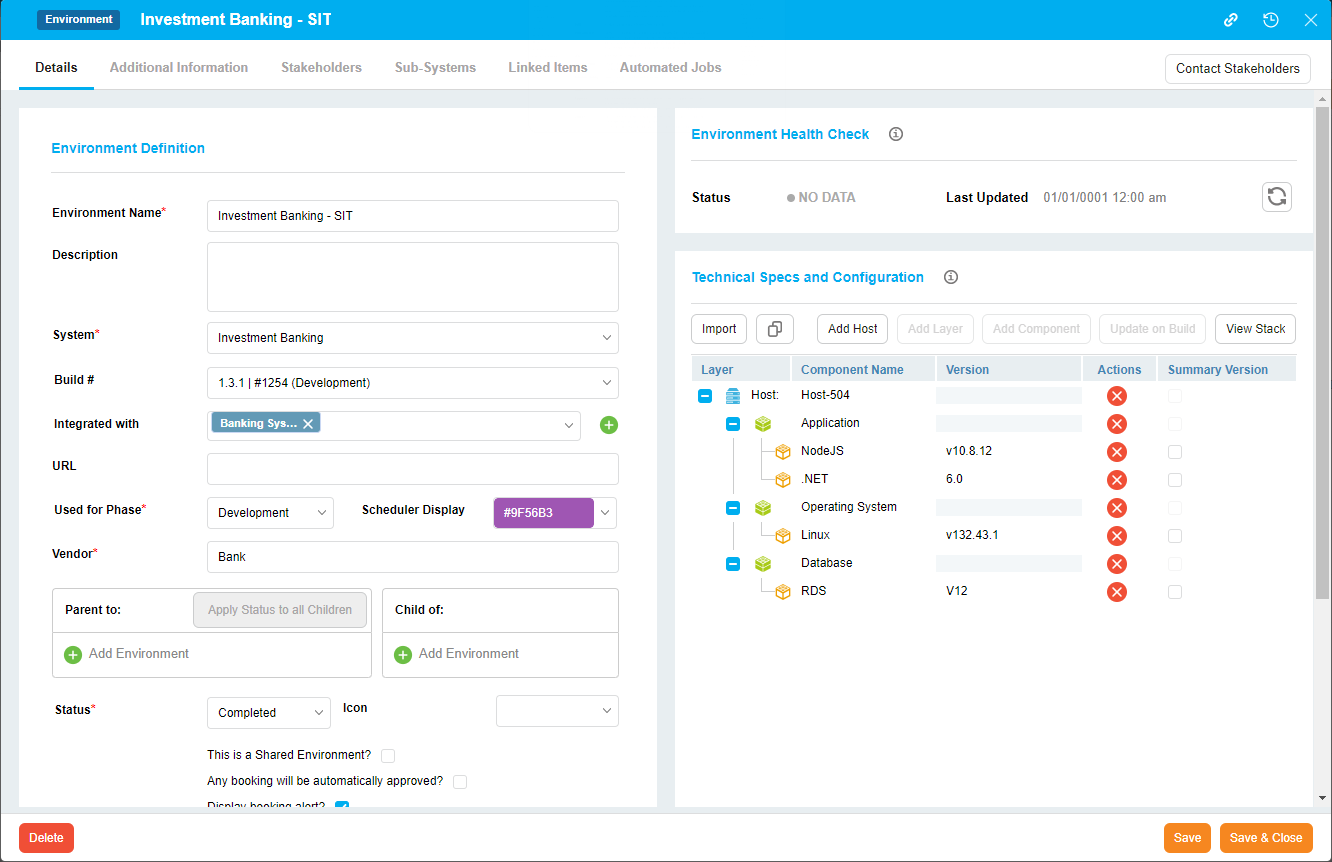
Details
Environment Definition
| Field | Description |
|---|---|
| Environment Name | Mandatory; Enter the Environment name. |
| Description | Provide a description of the Environment. |
| System | Mandatory; Select a System from the System drop-down menu. If the selected System has existing Sub-systems then the sub-system instances will automatically be created under the Sub-systems tab on save. Sub-systems are not available for selection in the System drop down Administrators can prevent users from selecting Systems outside their Portfolio Association by selecting the My Portfolio Association checkbox for the ‘Restrict Site-Wide View of Environments’ user permission. |
| Build | Enables on selecting a System. Select a build. |
| Integrated with | Select an Integrated Environment Group. Integrated Environment Groups can be toggled on Environment Map. You can select an existing Environment Group from the drop-down menu or create a new Environment Group for the Environment, see Manage Environment Groups for details. |
| URL | Enter the Environment’s URL. |
| Used for Phase | Select a phase for which the Environment is used. You can customize this menu via Used For Phase Customization. |
| Scheduler Display | Select a display color for this Environment to appear on the Environment Schedule. |
| Vendor | Enter a vendor for this Environment. |
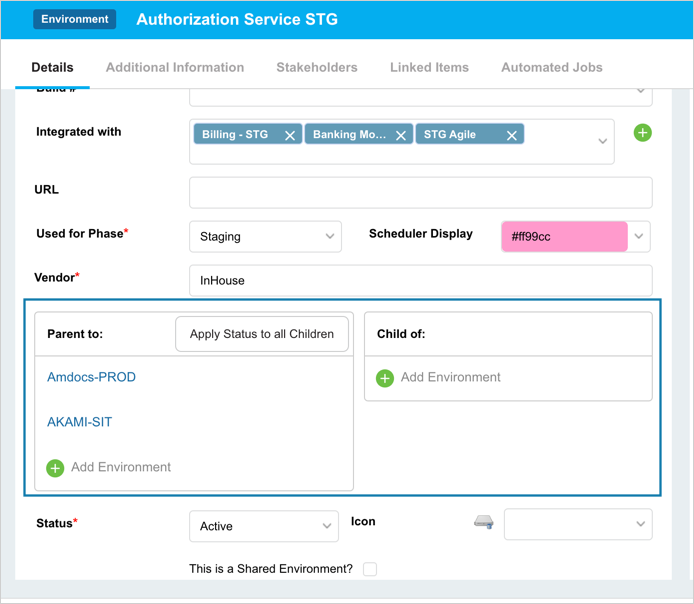
| Parent to | Add a linked Environment to which this Environment is a parent. For detailed steps, see Manage Linked Environment. To enable Linked Environments, go to Environment Setup Customization. |
| Child of | Add a linked Environment to which this Environment is a child. For detailed steps, see Manage Linked Environment. To enable Linked Environments, go to Environment Setup Customization. |
| Status | Select the Environment status. You can customize this menu in Status Customization. |
| Icon | Select an Icon. Icons are displayed in the Environment Map and provide an extra layer of information about the Environment. For example, whether the Environment is a Cloud Server. |
| This is a Shared Environment | Select this checkbox if the Environment can be booked multiple times simultaneously. |
| Any booking will be automatically approved | Select this checkbox to automatically approve any booking of an Environment, whether booked from a TEBR (with or without a Release) or a Release (Enterprise, Project, or Independent). The booking will stay in an approved state even if the dates of the booking are changed. |
| Display booking alert | Booking alerts pop-up to provide you with extra information when trying to book the Environment. Select the checkbox to make the alert pop-up appear. Type the message in the Message that will appear in the pop-up. |
Technical Specs and Configuration
Fill in the Technical Specs and Configuration form. For more information, see Manage Technical Specs and Configuration.
Environment Schedule
The button is enabled only when editing the Environment. Refer to Edit Environment.
After making the required entries, click ![]()
Click ![]() .
.
Edit Environment
To edit an existing Environment, search the Environment on the ‘Environment’ grid. For search and filter options, see Search and Filter Options on Environment Manager. Click on the Environment Name to open and edit. For details, see the above sections. The following options are visible/editable only in the edit mode:
Environment Health Check
To view the configured Health Check Dashboard information:
- NO DATA: No data has been provided via the API.
- ONLINE: The Environment is online.
- OFFLINE: The Environment is offline.
- ISSUE: The Environment is neither online nor offline but has an issue.
Click ![]() to get the latest status.
to get the latest status.
See the Swagger article for how to generate a token and use Swagger to access Plutora’s external APIs.
Use the following API endpoints to update your Health Check Status:
- POST /environmentHealthCheck: Populates the data in the Environment Health Check panel and Health Check Dashboard. Include the following data:
- Test Name.
- Status.
- An optional Log File or Test File as a text file attachment.
- POST /environmentHealthCheck/FullHistory
- POST /environmentHealthCheck/CurrentStatus

Environment Schedule
To check the Environment Allocation Schedule click ![]() . The ‘Environment Schedule’ page displays showing all the bookings for that Environment. For details, see Environment Schedule.
. The ‘Environment Schedule’ page displays showing all the bookings for that Environment. For details, see Environment Schedule.
More Information
Manage Linked Environment
Add a Linked Environment:
Ensure you have enabled Linked Environments (go to Environment Setup Customization. Environments already selected but outside the user’s Portfolio Association will be hidden if administrators select the My Portfolio Association checkbox for the ‘Restrict Site-Wide View of Environments’ user permission. Environments outside the user’s Portfolio Association will also not be available for selection)
- Click
 .
. - Click the combo menu and select one or more of the Environment checkboxes.
- Click
 .
.
The Environment lists under the ‘Parent to’/’Child to’ column.
Apply Parent Environment Status to Child Environments by clicking Apply Status to all Children. This option provides a one-off Environment Status push.
If you change the Parent Environment status again, the Child Environments will not automatically update and you will need to click Apply Status to all Children again.
Remove an Environment link:
To unlink an Environment, click X. Then click ![]() .
.
View Audit History
View Audit History of a record to access the associated history of the events and updates. To view the ‘Audit History’, click ![]() at the top-right corner of the pop-up. For more information, see Audit History.
at the top-right corner of the pop-up. For more information, see Audit History.
Copy URL
You can share an Environment’s URL by clicking ![]() at the top right corner of the pop-up. Then paste the URL into another application or document to be shared. For further information, see Copy URL.
at the top right corner of the pop-up. Then paste the URL into another application or document to be shared. For further information, see Copy URL.