

In this view option:
- Overdue Activities are highlighted in red.
- You can add/edit the activities on this view. See Add/Edit Activities.
- Activities open when clicked on Name from a sliding panel on the right.
- You can create and manage dependency among the Activities. See Manage Activity Dependency.
- Activities with a padlock are locked by a Finish to Start or Start to Start dependency.
- When an Activity is being updated by another user,
 will appear.
 - You will be asked to click Reload once the other user has clicked Save.
- A sequence column shows the numbering for all Activities.
- If you see the following error message A connection to the message management service failed close the error message and continue.
- Activity Groups have checkboxes so you can select all the Activities in the Activity Group with one click.
The grid column filter is the set of search fields and menus at the top of the columns, under the column headers.
If the grid column filter is a:
- Search field: Type a search term.
- Drop-down menu: Click to select a list item.
- Combo box: Click to select one or more checkboxes.
- Date field: Select a date and click
 .
.
Press the Enter key on your keyboard to run the filter.

You can show or hide these columns using the grid column selector. Hover your mouse cursor over the column header to see ![]() .
.
Click the button and select Columns. The list of columns available on the grid will be displayed. Select or deselect the checkboxes to show or hide columns.
Sort Activities
To sort the Activities:
- Hover your mouse cursor over the sort column.
 appears.
 - Drag and drop the Activities as you require to reorganize. You can drag and drop Activities in and out of Groups.
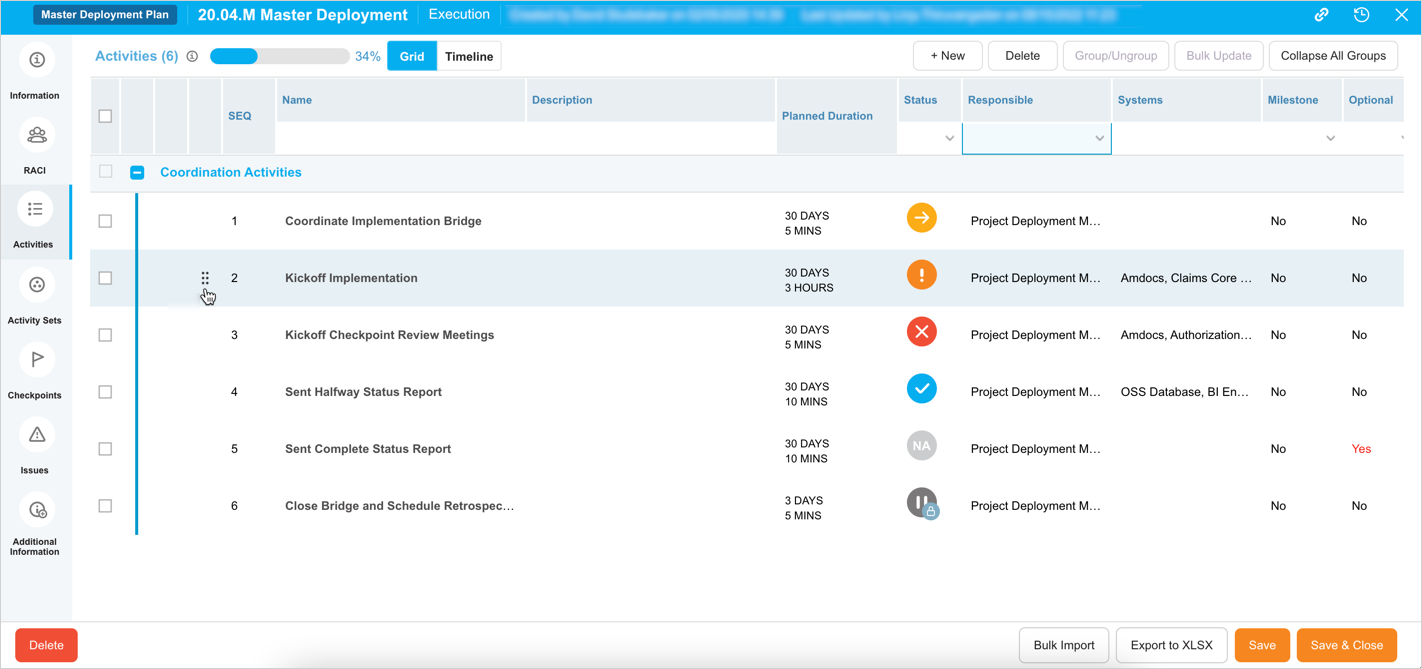
Click an Activity to open the edit panel and edit all the information. See Add/Edit Activities. Activities are displayed in groups, click ![]() or
or ![]() to expand/collapse the Activity Groups.
to expand/collapse the Activity Groups.
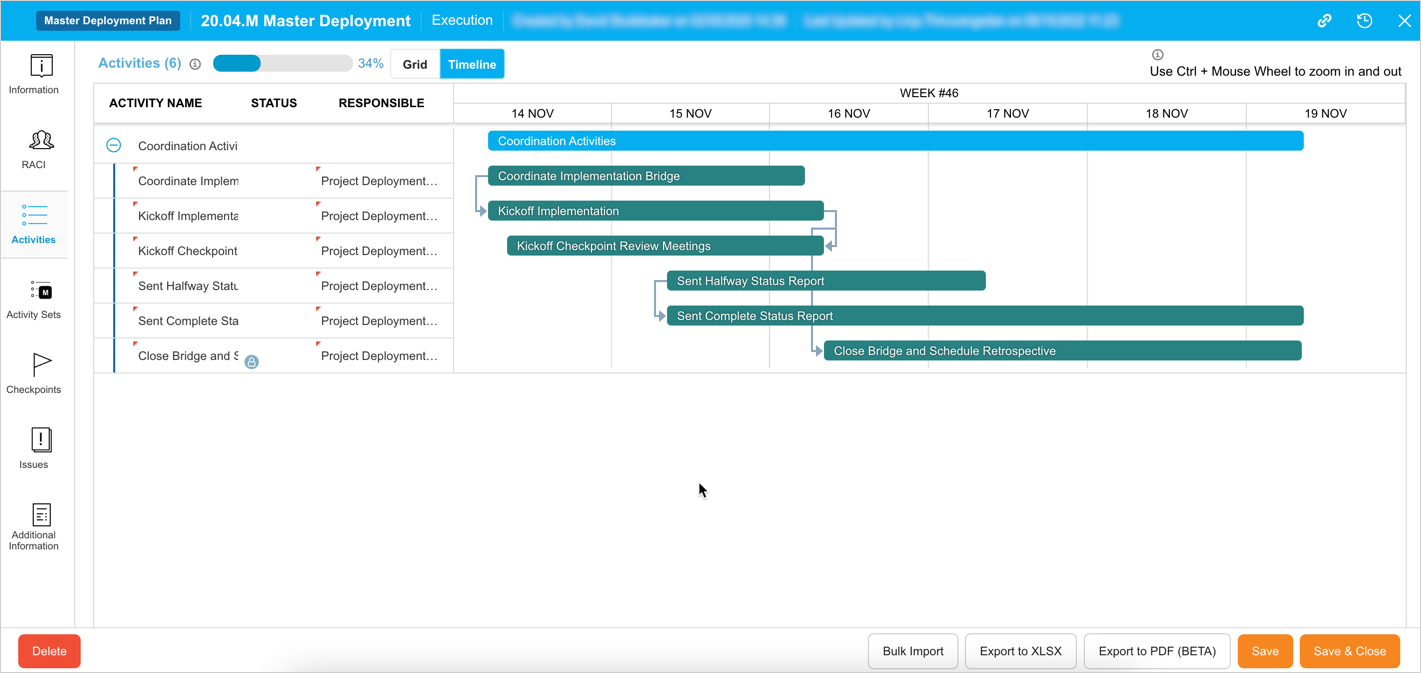
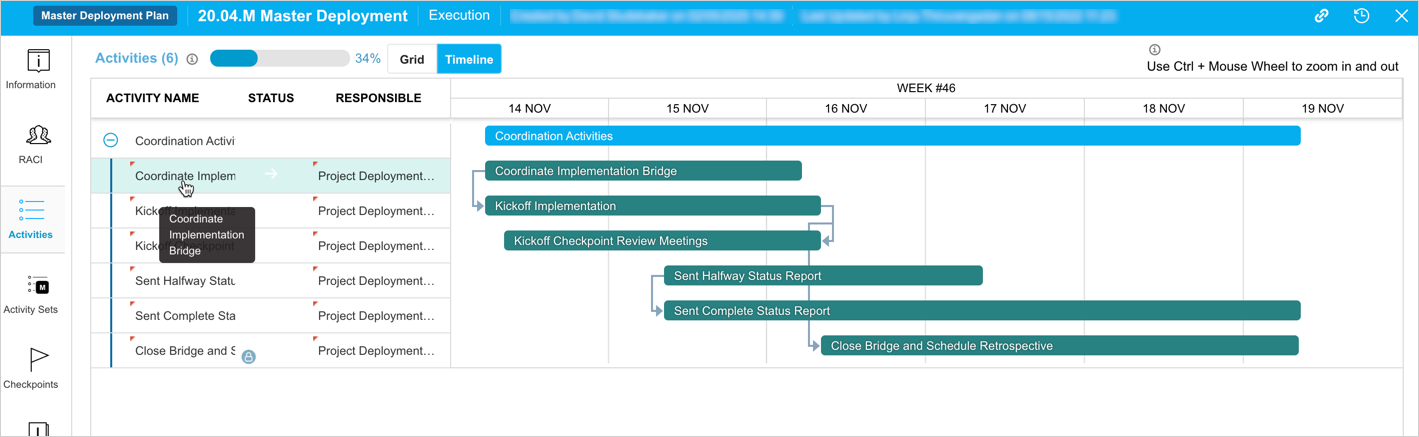
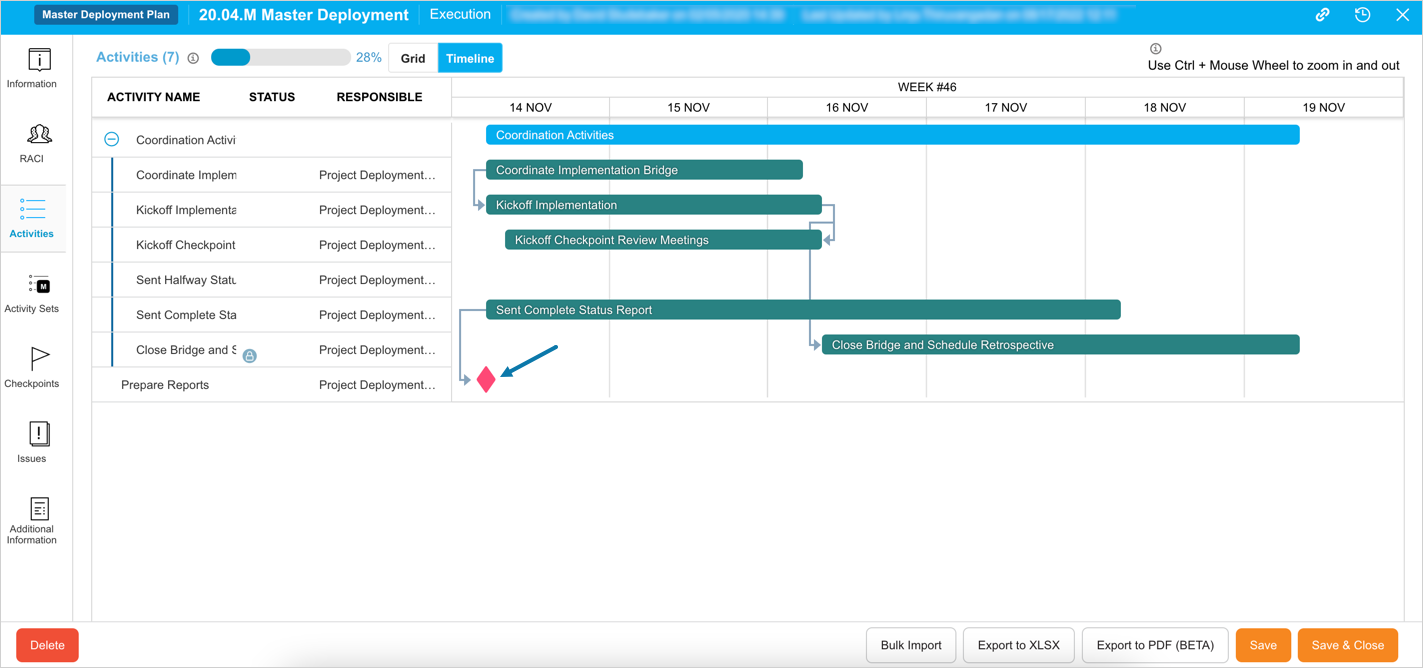
Activities appear in the timeline as bars and Milestone Activities as diamonds ![]() . The blue bars are Activity Group titles. View the timeline along the top, which can be zoomed in and out by holding down the Ctrl key on your keyboard while scrolling the mouse wheel.
. The blue bars are Activity Group titles. View the timeline along the top, which can be zoomed in and out by holding down the Ctrl key on your keyboard while scrolling the mouse wheel.
Add/Edit Activities
To add a new Activity, click ![]() on the Grid view. A ‘New Activity’ will be added on the grid. Click on it to display the ‘Activity’ panel on the right-hand side and fill in the following.
on the Grid view. A ‘New Activity’ will be added on the grid. Click on it to display the ‘Activity’ panel on the right-hand side and fill in the following.
Activity Details
| Fields | Description |
|---|---|
| Name | Mandatory; Enter the Activity Name. |
| Description | Enter the Activity description. |
| Systems | Select a System: You can only select from the Systems chosen in the Systems field under the Information tab. To run Automated Jobs from Jenkins or Integration Hub in Deployment Activities, Systems must be selected that have the correct Automated Jobs. |
| Environment | Select an Environment. Automated Jobs cannot be selected unless the Environment is selected. The Environments belong to the Systems selected above. |
| Dependency | Add Activity Dependency. For details, see Manage Activity DependencyManage Activity Dependency. |
| Link to Master Deployment Plan Activity Set | Applicable to Master Deployment Plans and their child Deployment Plans only; Add the Deployment Plan Activity to one or more Activity Sets by selecting the Activity Sets from this field. Activity Sets can only be linked or unlinked in Draft mode. You must have already created Activity Set(s) in the Master Deployment Plan to be able to link. |
| Automation | Add automation to perform deployments. For details, see Manage Automation. |
| People Responsible | Select the user responsible for the Activity from the drop-down. |
| Date & Time | Planned Start Time & Planned End Time: ‘Retained Activity Planned Duration’ checkbox allows you to retain your Activity Planned Duration if you update Start or End Dates. Simply select this checkbox when you edit Start Date, so the End Date will be adjusted automatically, and vice versa. Planned Duration: When you know the duration of an Activity, you can set only the Planned Start Time or Planned End Time, then type the Duration in Days, Hours, or Minutes and the missing start or end time will be automatically filled in. |
| Is this a milestone | If the Activity is a milestone: If toggled on, the Planned End Time will be erased and grayed out and only the Planned Start Time will be used. If toggled back to being an Activity, the Planned End Time will have to be typed again. The Actual End Date will be based on the time the Milestone is marked as Complete. |
| Is this optional | If the Activity is optional and there is no need to complete it before you can mark the Deployment Plan as complete. Optional Activities and Milestones have their own status, N/A, which can be set during Execution mode. Activities and Milestones that are N/A are treated as completed and are removed from any time remaining. |
| Will this cause a downtime | If the Activity will cause or experience a downtime, click this switch, which will reveal the Downtime From and Downtime To fields: If the ‘Enable Automatic Downtime Values’ checkbox is selected in Deployment Activities Customization, the Downtime From and Downtime To fields will be auto-filled with the Activity’s start and end dates, and will be auto-updated based on Planned Start and End fields updates. Otherwise, the Downtime From and Downtime To fields must be manually filled in. The time displayed is your local time based on your current browser settings. Downtimes cannot be set outside the dates of the Activity. |
Additional Information
Fill in or edit the Additional Information fields These Additional Information fields can be added or edited by administrators using the Deployment Plan Activities Custom Fields Customization and they will vary between each Plutora installation. Consult your administrator for the procedure for filling in these fields.
Set Target Builds:
Once a System and an Environment selection have been saved, you can set the Target Build configuration for the selected System and multiple Subsystems for that Environment.
- Click
 in the Builds section
 - Select the Build from the drop-down menu.
- Update the Note field
- Click
 .
.
If you want to configurate multiple versions of a single Subsystem running on a Environment you can add multiple Build and Notes.
To add additional Build and Notes click ![]() icon
icon
To remove an existing Build and Note, click the ![]() icon next to the relevant Build and Note
icon next to the relevant Build and Note
- View comments: Click the number that appears next to
 . The existing comments display with user, date, and timestamp details.
 - Add a comment: Click and enter your comment in Your comment field. Then click
 .
. - Reply to a comment: Click Reply below a comment. Enter your reply and click .
- Edit a comment: You can only edit your own comments. Click Edit below a comment. Edit your comment and click .
You can attach URLs and/or Files. To add a new attachment:
- Click

- Click
 .
. - Select Add URL or Add File.
- In the case of a URL, the ‘Add URL’ pop-up displays. Enter the URL in the field and click . In the case of a File, select an attachment file and click Open.
The selected URL or file display in the ‘Attachment’ section.
- To view an attachment, click
 next to the attachment.
 - To delete an attachment, click X next to the attachment.
- To download a file attachment, click
 next to the attachment.
Click ![]() to close the pop-up.
to close the pop-up.
To edit an existing Activity, search and click the Activity to open the pop-up and update the fields as required.
Update Activity Status
You can update the Activity status only if the plan is in the ‘Execution’ status. To know more about status, see Deployment Plan Status. Ensure that you have the permissions listed in the Pre-requisite.
In the Grid view, search and click the Activity to open.
Automated Activity
- If automated jobs have been loaded (see Orchestration Using Automated Jobs): Click Run Automated Jobs. The Automated Jobs will run. If the Activity has an automated Build (see Manage Builds), the Build will be automatically deployed to the selected Environment.
- If a Custom Script has been loaded: Click Run Script to run. (This button only becomes active once a script has been uploaded and the Activity saved.) The maximum script duration is 30 minutes. Other users viewing the Deployment Plan Activity will see the script running. Insert the following line into your script to post a progress update into the UI where the Upload New File button appears:
Manual Activity
- Click an Activity Name in the grid. The right panel slides open.
- Click to select a status from the Status. The statuses have the following circular icons:
- Not Started.

- In Progress: Sets Actual Start Time.

- Issue.

- Failed.

- Completed: Sets Actual End Time:
 . If the Activity has a selected Build, once the Activity’s status is set to Completed the selected Build will be deployed to the selected Environment.
- Not Started.
- N/A:
 . This is available only for Optional Activities. Activities that are N/A are treated as completed in completion bars and are removed from any time remaining.
- N/A:
Activities locked by Finish to Start (F-S) or Start to Start (S-S) dependencies display a padlock icon over their status icon.
Select a Revised Start Time or a Revised End Time if the Activity is complete and the dates and times the In Progress and Completed buttons were clicked do not reflect actual start and end times
Delete Activity
You can delete Activities in Draft/Approved/Execution status.
To delete one or more Activity(s), select the Activity(s) and click ![]() .
.
Click ![]() on the confirmation prompt. The selected Activity(s) will be no longer available on the grid.
on the confirmation prompt. The selected Activity(s) will be no longer available on the grid.
Bulk Update Activities
To bulk update the Activities, select two or more Activities on the grid and click ![]() . The Bulk Update pop-up displays. Fill in the following information:
. The Bulk Update pop-up displays. Fill in the following information:
| Fields | Description |
|---|---|
| Activity Status | Click the checkbox to make the Activity Status drop-down menu editable. Select an Activity Status. The N/A status is only available if the Activities are optional. |
| Responsible | Click the checkbox to make the Responsible drop-down menu editable. Update the responsible Stakeholder. To delete all the responsible Stakeholders, leave the field blank. |
| System | Click the checkbox to make the System drop-down menu editable. Update the system by selecting from the drop-down. To delete all the Systems, leave the field blank. When a System is selected, the Environment and Build can be selected. |
| Planned Date & Time | Click the checkbox to make the fields editable.
|
Click ![]() .
.

Manage Activity Dependency
You can add dependency in Draft/Approved/Execution status.
Manage Dependency in Grid View
If you are adding a Deployment Plan, click ![]() before adding a dependency.
before adding a dependency.
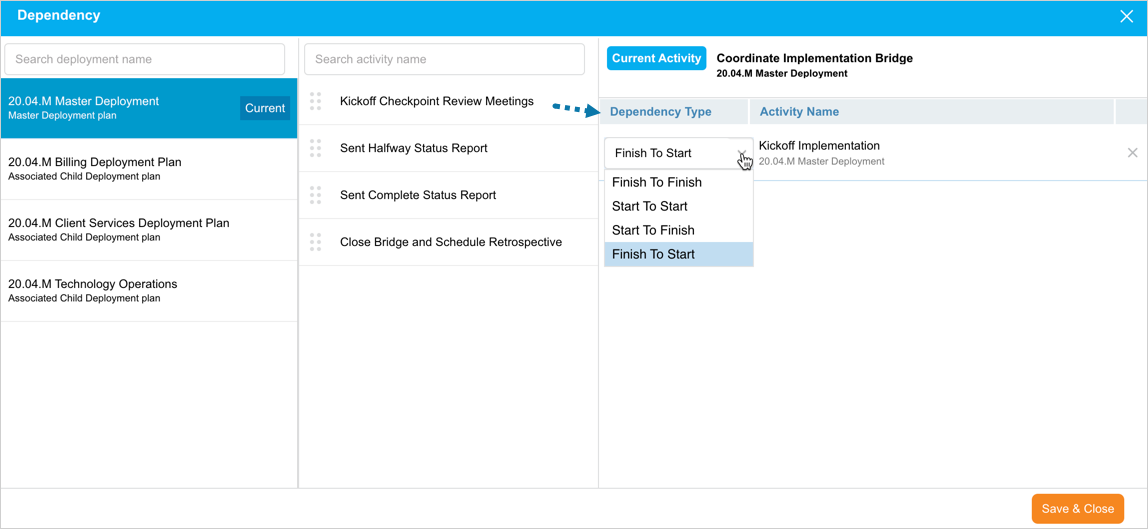
Add Dependency
To add a dependency:
- Search and click the Activity to open the ‘Activity’ panel.
- Scroll down and click
 on the Dependency field.
 - The Dependency pop-up displays. All the associated Deployment Plans (Child or Master) will appear in the Dependencies pop-up.
- Select the Deployment Plan.
- If a Master Deployment Plan is selected, all the child Deployment Plans will appear in the left-hand panel, so that dependencies between Deployment Plans can be added.
- If an independent Deployment Plan is selected, only dependencies within that Deployment Plan can be added.
- Drag and drop Activities to the right panel of the Dependencies pop-up. There is no limit to how many Dependencies can be added.
- Select a Dependency Type (mandatory).
- Click .
Dependency Types
- Finish-to-Start (F-S): Default Dependency Type;
- Ensures the previous (upstream) activity is finished before the current (downstream) can be started
- Constraint: The Upstream Planned End Time must be less than the Downstream Planned Start Time
- Start-to-Start (S-S):
- Ensures the previous (upstream) activity is started before the current (downstream) can be started
- Constraint: The Upstream Planned Start Time must be less than the Downstream Planned Start Time
- Finish-to-Finish (F-F):
- Ensures the previous (upstream) activity is finished before the current (downstream) can be finished
- Constraint: The Upstream Planned End Time must be less than the Downstream Planned End Time
- Start to Finish (S-F):
- Ensures the previous (upstream) activity is started before the current (downstream) can be finished
- Constraint: The Upstream Planned Start Time must be less than the Downstream Planned End Time

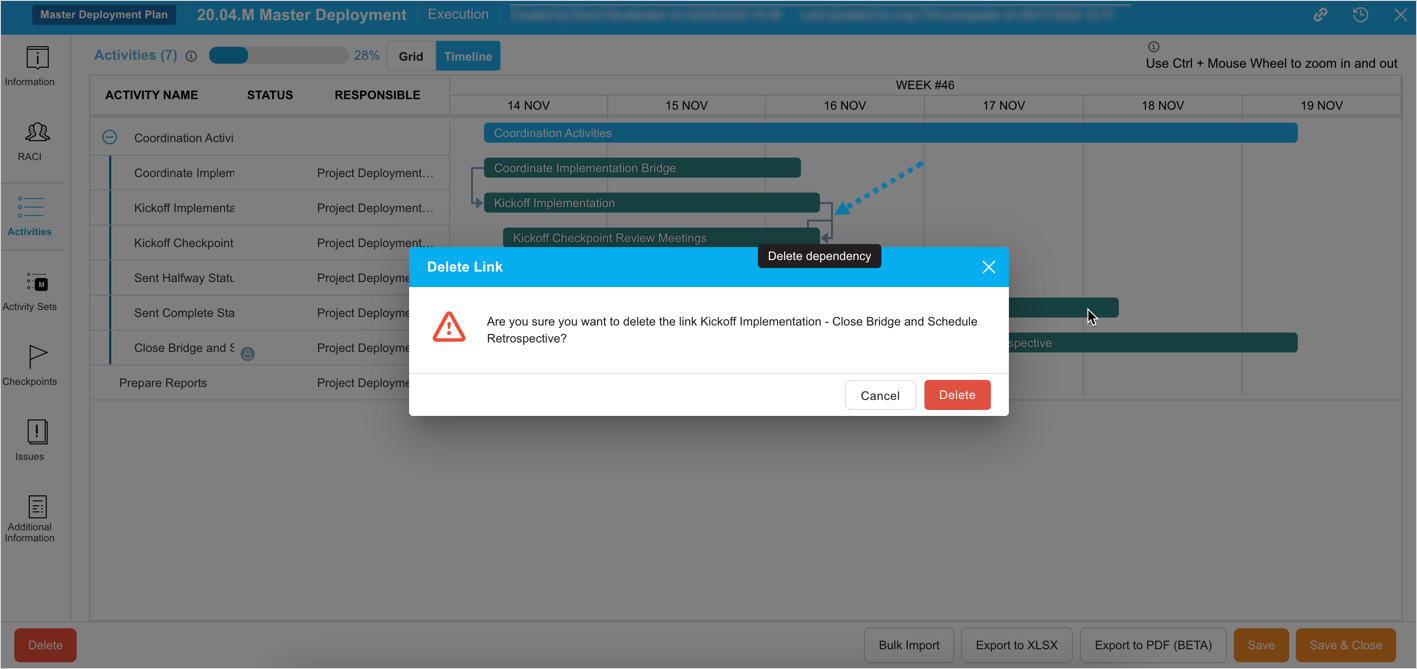
Remove Dependency
- Click the dependency line.
- Click
 on the confirmation prompt.
Manage Automation
Deployment Plan Activities with Custom Scripts, or Automated Jobs from Jenkins or Integration display ![]() .
.
Automated Jobs: For automated jobs: See Orchestration Using Automated Jobs.
Custom Scripts:
- Run a NodeJS script that performs deployments by connecting to external applications using APIs and updates fields such as the Activity Status.
- To upload your script: (Mandatory field), click Upload.
- Select the script. Only .js files can be used.
- Click Open.
- There is currently no way to edit a script. You must upload a new script instead.
- Scripts can only be run in Execution mode. See Update Activity Status for running scripts.
- Download the script by clicking

- Upload a new script by clicking

- Click Run Script to make the script run.
- Click View History to see a list of job run logs.
- Delete the script by clicking X.
- Manage Parameters: Parameters allow easy configuration via the UI. Parameters can also be masked for security. See Script Syntax in Integration Hub for how to reference parameters in a script.
- Click Set Parameters. (This button only becomes active once a script has been uploaded and the Activity saved.)
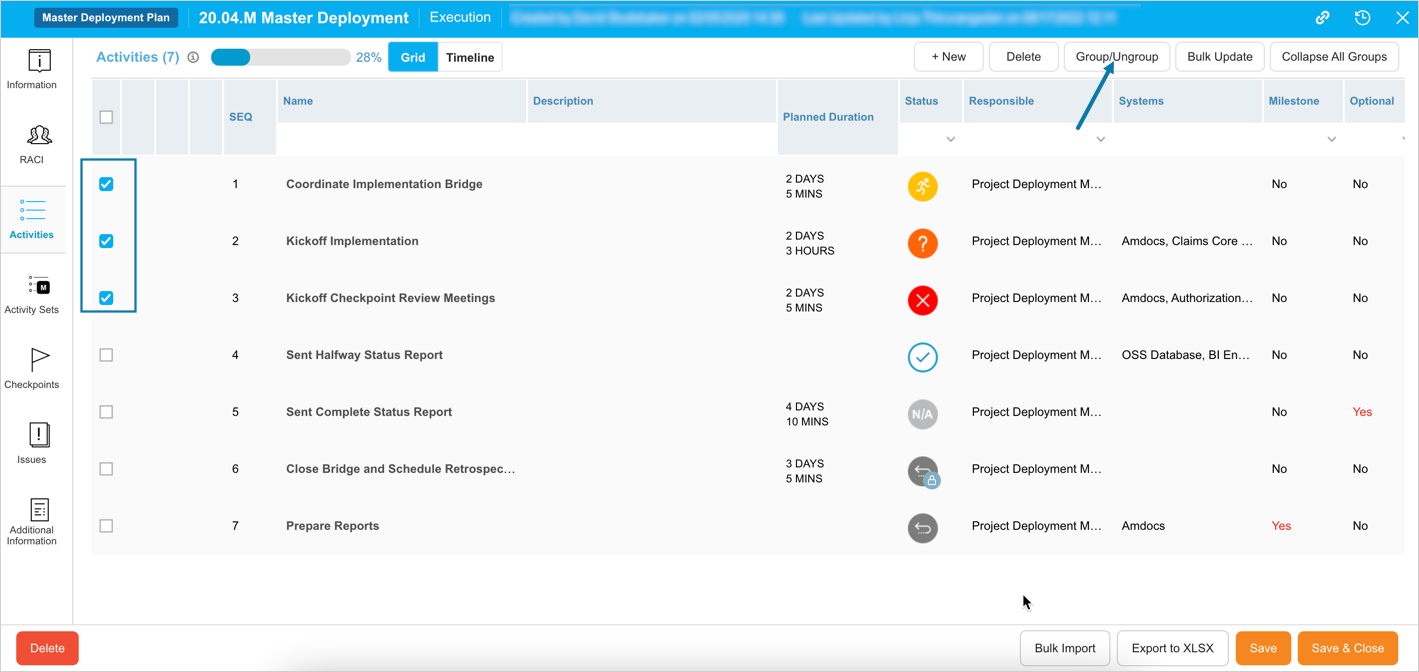
Manage Activity Groups
Add Activity Group
You can group Activities by selecting two or more Activity checkboxes and clicking ![]() .
.
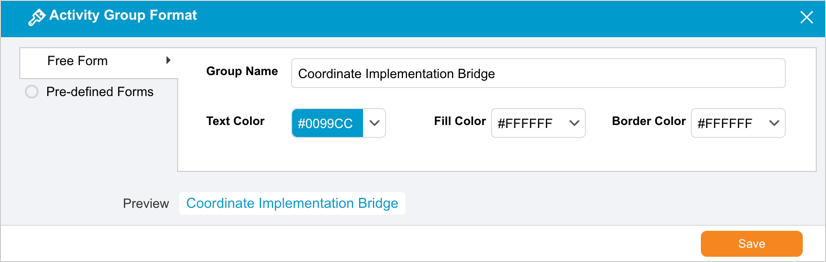
Edit Activity Group
Hover your mouse cursor over the Activity Group and click ![]() .
.
Free Form edit:
- Click the Free Form radio button.
- Type the Group Name.
- Select the text color from the Text Color drop-down menu or type a hex color.
- Select the fill color from the Fill Color drop-down menu or type a hex color.
- Select the border color from the Border Color drop-down menu or type a hex color.
- Click
 .
.
Use a pre-defined name and colors:
Administrators can use Group Name Customization to create group names and colors. The Pre-defined Forms radio button will be grayed out if the Group Name Customization is not enabled.
- Click the Pre-defined Forms radio button.
- Select a Group Name from the drop-down menu. All the other fields, such as Text Color will populate.
- Click .
Export Deployment Plan Activities to XLS
To export your Activities to XLS:
- Open the Deployment Plan by clicking the Name.
- Click the Activities tab.
- Click
 .
.
Your Excel file should start downloading immediately without any other interaction. If it doesn’t, check your pop-up blocker settings.
