
Introduction
The ‘Environment Selection’ section, in TEBR, allows you to view and book Environment(s) and Group(s) in a grid view. With the grid view you can:
- see the availability status of the Environments prior to trying to book them. This shifts-left Environment Contention Management.
- perform the booking approvals and booking date edit in-line within a grid format.
- have an improved user experience of viewing the Environment Schedule using a link within the ‘Add Environment/Group’ modals.
- see a list of Environments/Groups within the modals without limitation.
- identify the Environments that have been blocked out (booked) for a purpose such as a code freeze or data refresh, and allow you to proceed with booking on having the required permission.
Pre-requisite
You must have the following user permission:
- To access TEBR, you must have View TEBR Grid permission.
- To change the booking status, you must have Update Environment Booking Request permission.
Navigation
Environment > Requests and
Release > Manager > Environment tab
‘Environment Selection’ in TEBR
To access the ‘Environment Selection’ section in TEBR,
- Navigate to Environment > Requests.
- Select TEBR. You can customize this term, see Menu Setup.
- Click the Booking Request Number or Booking Request Title to open the booking request.
- Scroll down to view the ‘Environment Selection’ section.

Grid Layout – Booking with Project/Release
If your TEBR is created via Booking with Project/Release, then the ‘Environment Selection’ lists all the phases of the linked Release. Underneath these Phases, the Environment/Group booking details are displayed. Click ![]() to expand or collapse the Phase. The count next to the Phase represents the number of Environments/Groups booked for that Phase. To update the Phase date see Manage Release Activities.
to expand or collapse the Phase. The count next to the Phase represents the number of Environments/Groups booked for that Phase. To update the Phase date see Manage Release Activities.

For grid column description, see the table below.
Grid Layout – Booking with Environment Only
The grid displays the linked Environment(s) and Group(s).

For grid column description, see the table below.
‘Environment Selection’ in Release Manager
To view and book Environments/Groups for a Release:
- Navigate to the Release Manager page.
- Search and open a Release.
- Click the Environment tab.
The ‘Environment Selection’ lists all the phases of the Release. Underneath these Phases, the Environment/Group booking details are displayed. Click ![]() to expand or collapse the Phase. The count next to the Phase represents the number of Environments/Groups booked for that Phase. To update the Phase date see Manage Release Activities.
to expand or collapse the Phase. The count next to the Phase represents the number of Environments/Groups booked for that Phase. To update the Phase date see Manage Release Activities.
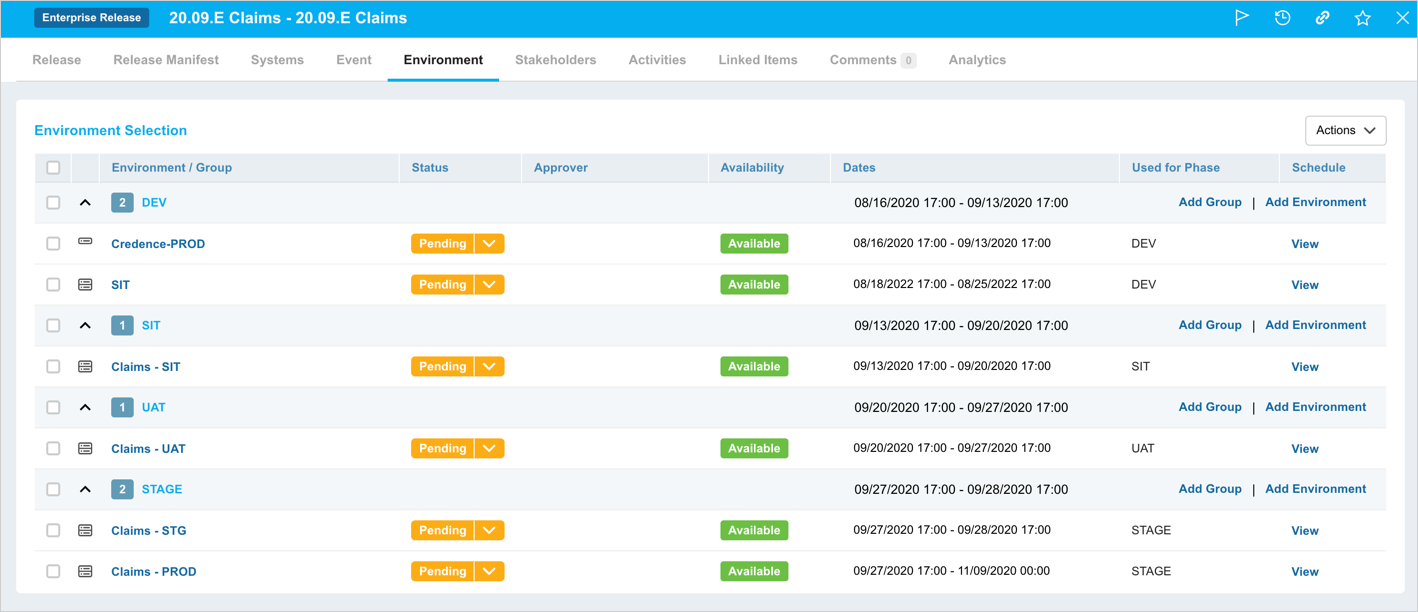
 : This icon represents an Environment Group on the grid and
 : This icon represents an Environment on the grid.
| Column | Description |
|---|---|
| Environment/Group | It is the Environment/Environment Group name. |
| Status | Displays the current status of the Environment booking. Change the status of the booking by clicking the drop-down. If there is no drop-down option displayed, it means that you do not have the required permissions to approve/reject a booking request. |
| Approver | Displays the user who has approved/rejected the booking. The column will be blank if the booking status is 'Pending.' |
| Availability | Displays the Environment availability. The column will be blank if the booking status is Approved/Rejected. For details on how Plutora displays the Environment/Group availability in relation to the status see Environment Availability. |
| Dates | Displays the Start and End Booking dates. Click on the date for the respective Environment/Group to edit the booking dates. |
| System | Displays the linked System name. |
| Used for Phase | Environment(s)/Group(s) phase. |
Add Group
To add an Environment Group, click Add Group. For ‘Booking with Project/Release’ click Add Group next to the respective Phase.
‘Add Environment Group’ pop-up:
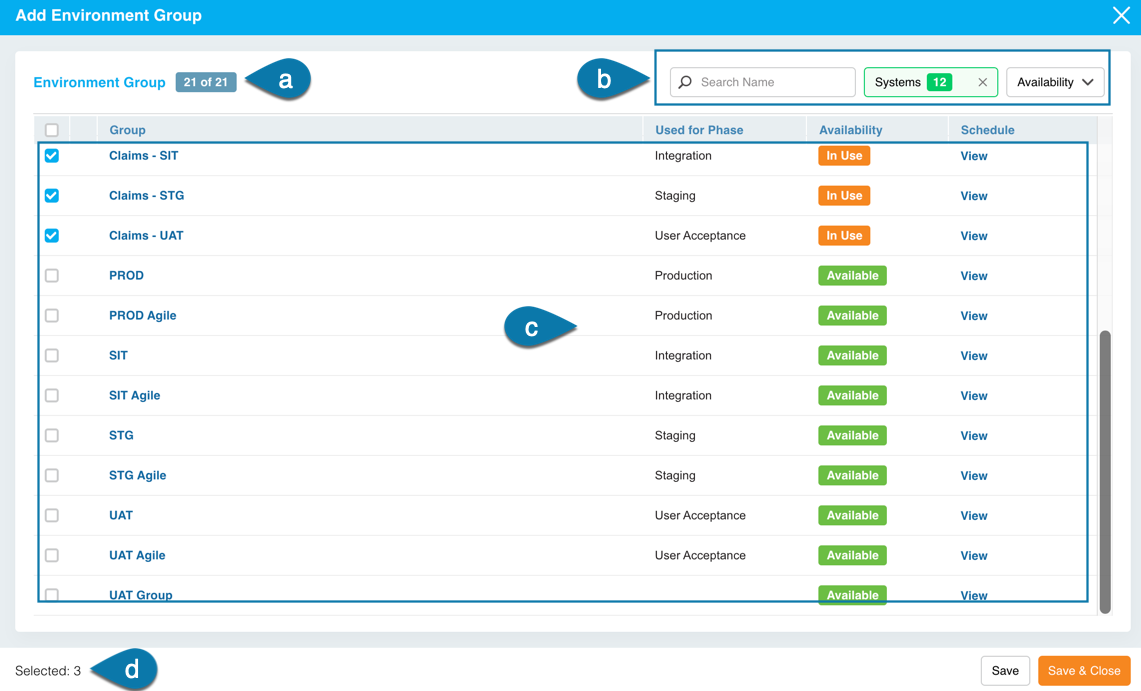
a: Number of Environment Groups displayed out of the total filtered Environment Groups.
b: Filter options:
| Filter Fields | Description |
|---|---|
| Search Name | Search the Environment Group by name. |
| Systems | Search the Environment Group by the linked System. If you have linked Impacted Systems to the TEBR then, by default, the Impacted Systems filter will be applied and the grid displays the Environment Groups that are linked to those Systems. To remove the filter, click |
| Availability | Filter by Environment Group availability. To be able to book a 'Blocked' Environment Group, you must have 'Book Environments during Blockout' user permission. |
c: Environment Groups displayed as per the filter applied along with their availability. Clicking View in Schedule will show the respective Environment Group Schedule in a new browser tab.
d: Total number of Environment Groups you have selected on this pop-up.
Select the Group(s) that you want to book and click ![]() . The selected Group(s) are displayed on the grid.
. The selected Group(s) are displayed on the grid.
Add Environment
To add an Environment (or book an Environment ), click Add Environment. For ‘Booking with Project/Release’ click Add Environment next to the respective Phase.
‘Add Environment’ pop-up:
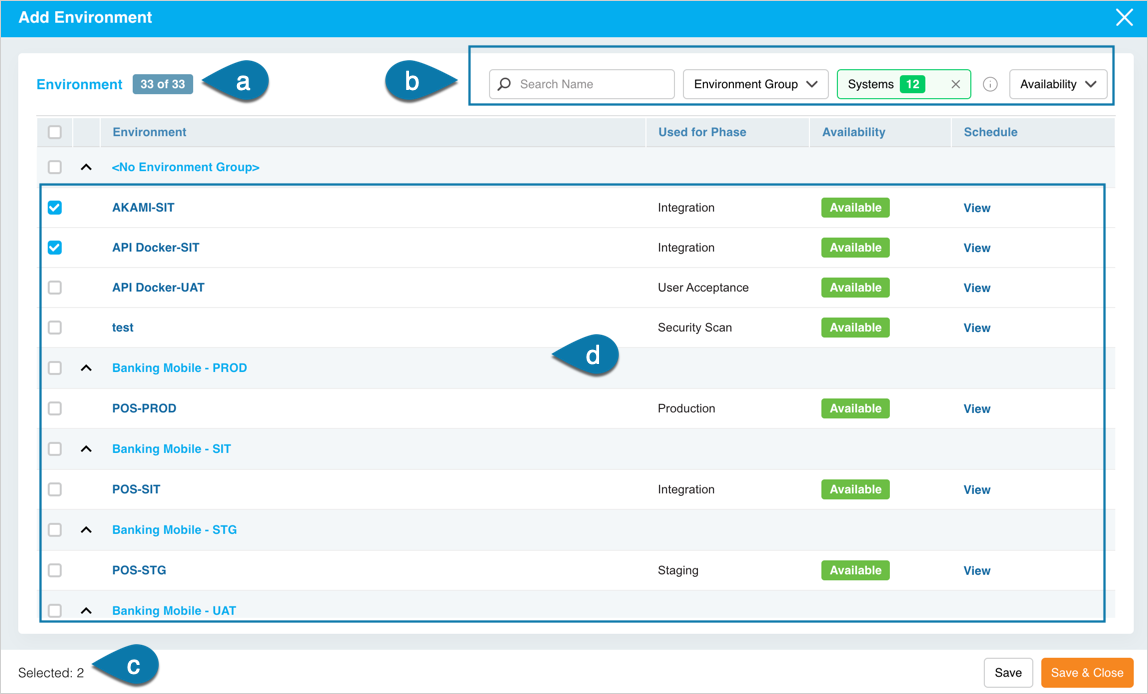
a: Number of Environments displayed out of the total filtered Environments.
b: Filter options:
| Filter Fields | Description |
|---|---|
| Search Name | Search the Environment by name. |
| Environment Group | Search by Environment Group. Select one or more groups from the drop-down. If the Environments are filtered by any other active filters (such as 'Systems'), you may not see all the members of an Environment Group. |
| Systems | Search the Environments by the linked System. If you have linked Impacted Systems to the TEBR then, by default, the Impacted Systems filter will be applied and the grid displays the Environments that are linked to those Systems. |
| Availability | Filter by Environments' availability. To be able to book a 'Blocked' Environment, you must have 'Book Environments during Blockout' user permission. |
c: Environments displayed as per the filter applied along with their availability. The Environments are grouped by their Group on the grid. This is to enable you to book all the Environments in a particular Group. The Environments that do not belong to a group, appear at the top of the grid. Clicking View in Schedule will display the respective Environment Schedule in a new browser tab.
d: Total number of Environments you have selected.
Select the Environment(s) that you want to book and click ![]() . The selected Environment(s) are displayed on the grid.
. The selected Environment(s) are displayed on the grid.
If you are unable to find an Environment on the modal, ensure that you have applied the filters correctly.
If the Environment checkbox is disabled on the modal and you are unable to select the Environment, it means that the Environment is non-bookable. To make an Environment bookable or non-bookable see Environment Status.
Change Booking Status
You can change the booking status from ‘Pending’ to ‘Approved’/’Rejected’ from the grid by clicking on the Status drop-down.

If there is no drop-down for status, it means that you do not have the required permission (Update Environment Booking Request) to change the status.
On Approving/Rejecting a booking, the ‘Appover’ column displays the approver/rejector details and the ‘Availability’ column will no longer display the Environment/Group availability. For Environments that are set to Auto-Approve, see Auto Approved Environments.
To know more about how Plutora displays the Environment/Group availability concerning the status, see Environment Availability.
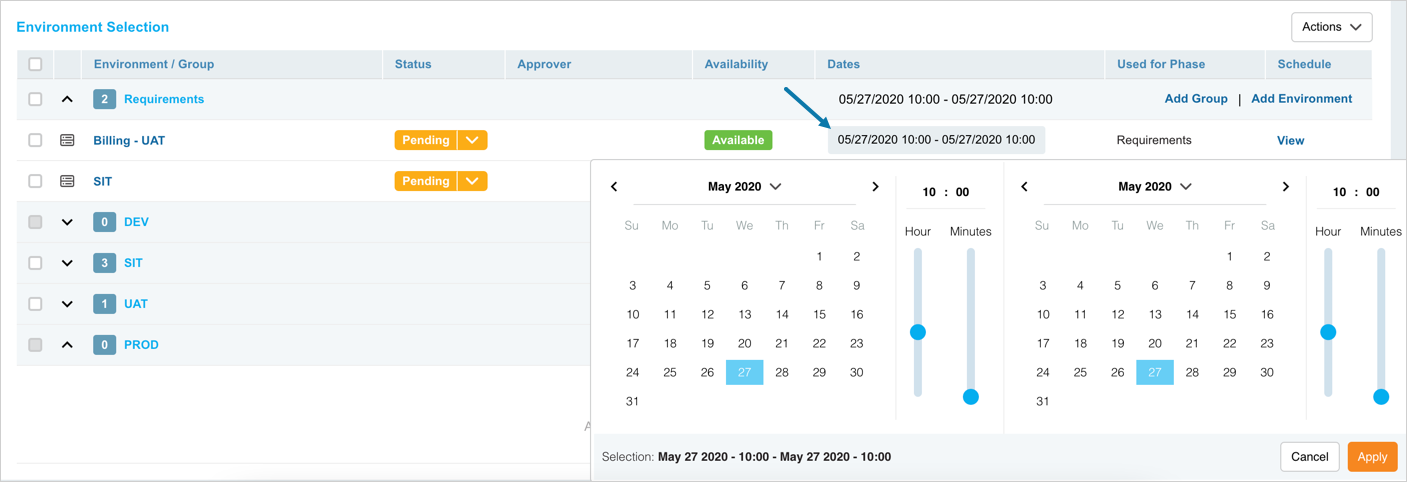
Update Booking Dates
To update the Booking Dates, click on the date range on the grid to display the calendar. Select the new date range and click ![]() .
.
Bulk Update
To Bulk Update the bookings in a TEBR:
- Select two or more Environment(s)/Group(s)
- Click
 .
. - Click Bulk Update.
| Options | Fields |
|---|---|
| Dates |
|
| Status | Change the booking status from the drop-down. If drop-down option is not available, it means you do have the required permission to change the status. |
- Click
 .
.
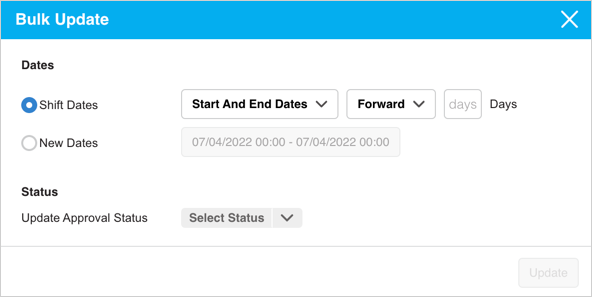
Plutora will bulk update the Environments for which you have the required permission.
Remove Bookings
To delete one or more bookings:
- Select the Environment(s)/Group(s).
- Click .
- Click Remove Items.

The Environment(s)/Groups(s) booking(s) will be removed.
More Information
Status vs Availability
| Status | Availability |
|---|---|
| Rejected | Not displayed |
| Pending | Display 'Available' if the Environment/Group is available for booking for the selected date range else display 'Conflicting'. |
| Approved | Not Shown |
- Available – The Environment/Group is not booked in another TEBR or Release booking for all or part of the same period. The Booking Status will change to ‘In Use’ once the Approval Status is set to ‘Approved’. The Booking Status will remain as ‘Available’ if the Approval Status is set to ‘Rejected’.
- In Use – The Environment/Group Approval Status has been set to ‘Approved’ for a booking in the current TEBR/Release booking.
- Conflicting – The Environment/Group is already booked in another TEBR or Release Booking for all or part of the same period. The Booking Status will change to ‘In Use’ if the Approval Status is set to ‘Approved’ (the conflict has been agreed, possibly due to environment sharing). The Booking Status will be set to ‘Available’ if the Approval Status is set to ‘Rejected’ (as there is no longer a conflicting booking).
The Availability column display ‘Conflicting’ only if the Approval Status is ’Pending’. Environments/Groups marked as ‘Shared’ will never display ‘Conflicting’.
Auto Approved Environments
The Environment(s)/Group(s) that have ‘Any booking will be automatically approved?’ checked in the Environment Details will always have the booking Status ‘Approved’. In this case, the Approver column will be blank.
Release with no Phase
If the linked Release does not have a Phase, the ‘Environment Selection’ section will display ‘No records to display. Add one or more phases to the release to enable bookings’. To add a Phase to a Release, see Manage Phases and Gates.
Save TEBR to Add Bookings
To add Environment Bookings, you must first save the TEBR.