
Users fill in Requirements Custom Fields when adding or editing Requirements.
Location of Requirements Custom Fields in Plutora Test
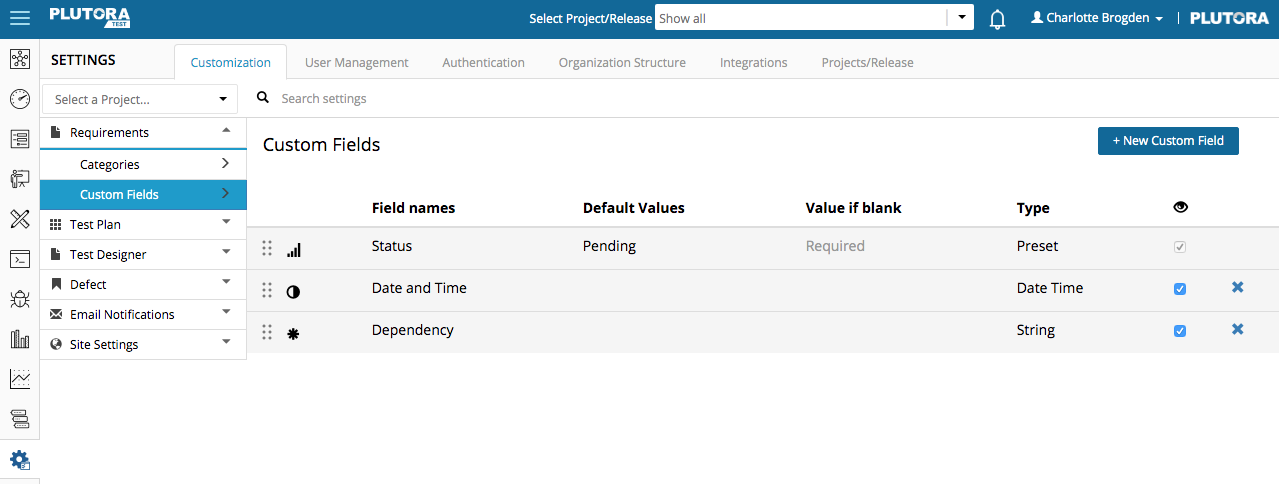
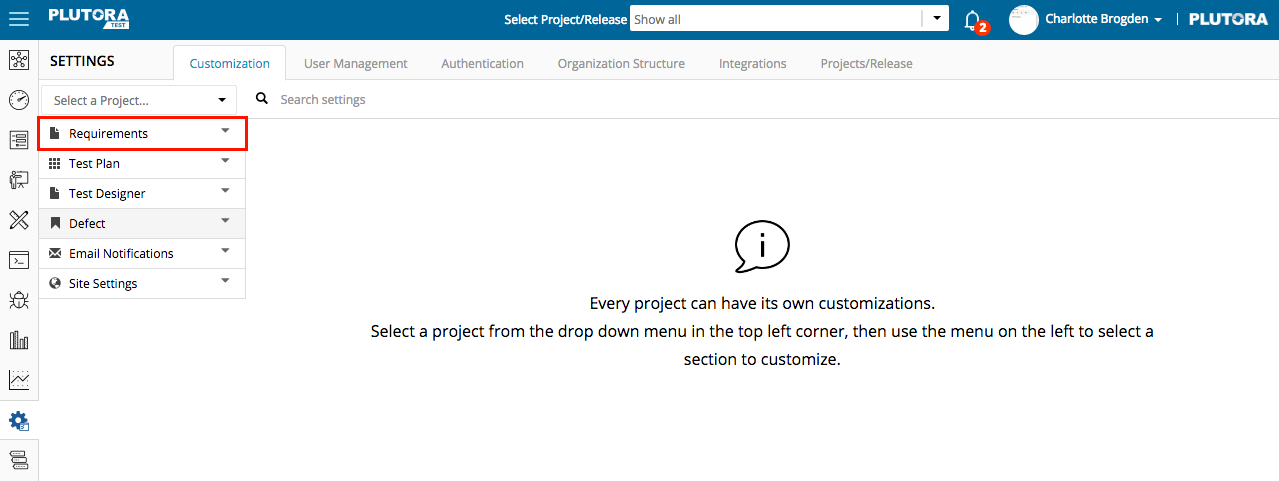
To locate Requirements Custom Fields:
- Click Requirements.

- Locate Requirements Custom Fields:
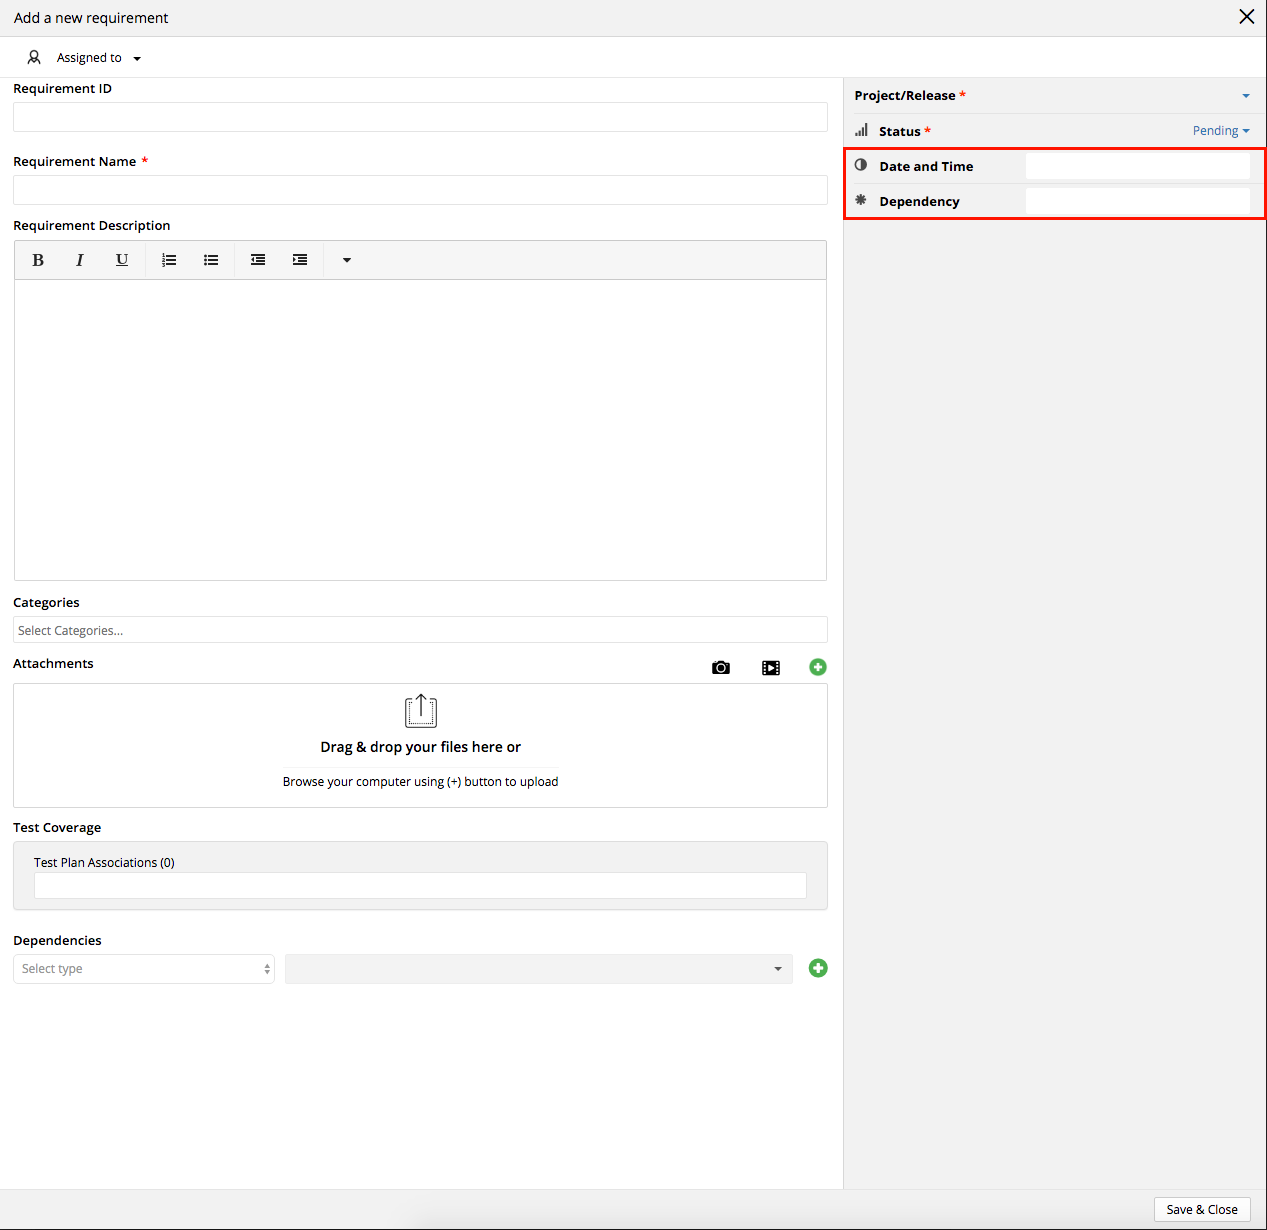
- When adding a new Requirement:
- When editing a Requirement:
- Click a blue-linked ID or Requirement Name.
The Edit Requirement pop up opens. Requirements Custom Fields are on the right side of the pop up, under the Project/Release drop-down menu.
- Click a blue-linked ID or Requirement Name.
Add or Edit a Requirements Custom Field
To add a Requirements Custom Field:
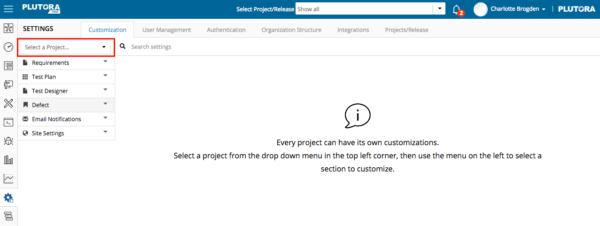
- Click Settings.

- Select a Project from the Select a Project… drop-down menu in the top-left corner.
If you do not select a Project, the Requirements Custom Field will apply to all Projects.
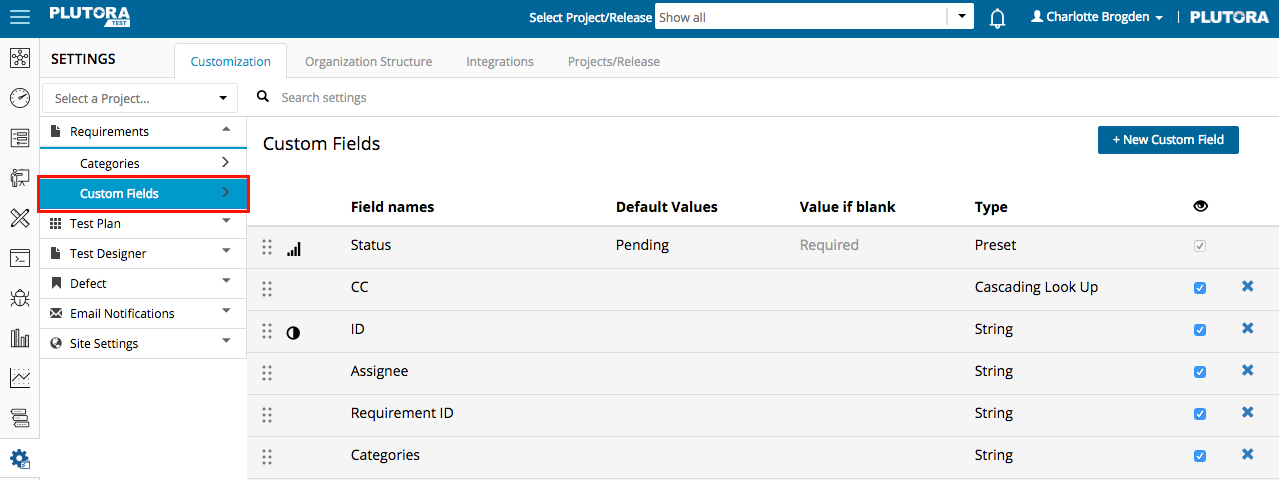
- Click Requirements in the left-hand menu.

- Click Custom Fields.

- Add a Requirements Custom field: Click + New Custom Field.
Or:
Edit a Requirements Custom Field: Click the blue-linked Field Name. - Type the Name. (Mandatory field.)
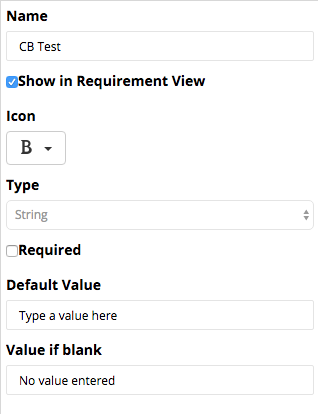
Custom Fields with double quotes ” or square brackets [] in the Value cannot be added to Plutora Analytics workbooks. - Click to select the Show in Requirement View checkbox.
The Show in Requirement View checkbox hides or unhides the Requirement Category’s visibility in the drop-down menu when adding or editing Requirements. - Click to select an icon to represent the field from the Icon drop-down menu.
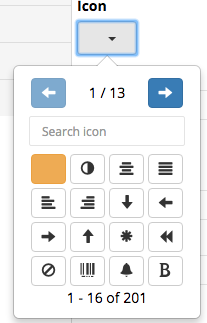
- Click the blue arrows to scroll through the icons.


- Click the blue arrows to scroll through the icons.
- Click to select a field Type:
- String: A single line of text. For example, a name.
- Required checkbox: Click to select if you would like the field to be mandatory.
- Default Value: Type the text that will autofill the field.
- Value if blank: Type the text that will be saved if the field is blank. This field will be grayed out if the Required checkbox is selected.
- Multiline String:
Multiline String fields are text fields that expand to fit their contents.- Required checkbox: Click to select if you would like the field to be mandatory.
- Default Value: Type the text that will autofill the field.
- Value if blank: Type the text that will be saved if the field is blank. This field will be grayed out if the Required checkbox is selected.
- Drop down: A drop-down menu.
- Required checkbox: Click to select if you would like the field to be mandatory.
- Default Value: Mark a value as the Default. This step is not mandatory.
- After creating two or more items (see Add an item below) click to select one of them from the Default Value drop-down menu.
- This value will appear in the menu before any value is selected.
- After creating two or more items (see Add an item below) click to select one of them from the Default Value drop-down menu.
- Values:
- Add an item to the drop-down menu:
- Click the blue cross.

- Type a Name.
- Type a Description.
- Click Save.
- Repeat to add more items to the drop-down menu.
- Click the blue cross.
- Edit an item:
- Click the blue pencil.

- Type a Name.
- Type a Description.
- Click Save.
- Click the blue pencil.
- Sorting drop-down menu fields changes their order in the menu:
- Sort the fields by dragging them by the sort handle
 (three dots).
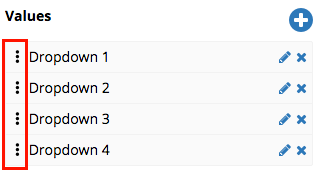
- Sort the fields by dragging them by the sort handle
- Delete an item:
- Click the blue X.

- Click the blue X.
- Add an item to the drop-down menu:
- Cascading look up: Selecting from a cascading look up opens another menu with further selections.
- Create and save a drop-down menu with all the submenu items. (Go to step b. above.)
- While creating the drop-down menu:
- Required checkbox: Click to select if you would like the submenu to be mandatory and always visible.
- If Required is unchecked, the submenu will only appear when users select from the main cascading look up.
- Default Value: Mark a value as the Default so that it appears in the drop-down menu before anything is selected. This step is not mandatory.
- While creating the drop-down menu:
- Required checkbox: Click to select if you would like the cascading look up to be mandatory.
- Default Value: Mark a value in the cascading look up as the Default. This step is not mandatory.
- After creating two or more items (see Add an item below) click to select one of them from the Default Value drop-down menu.
- This value will appear in the menu before any value is selected.
- After creating two or more items (see Add an item below) click to select one of them from the Default Value drop-down menu.
- Select a child selector: Click to select the submenu items drop-down menu you created in step i. Do not click Cascading Selector Mapping until you have created Values (see below) or you will have nothing to map.
- Values:
- Add an item to the cascading look up field:
- Click the blue cross.
- Type a Name.
- Type a Description.
- Click Save.
- Repeat I-IV to add more items to the drop-down menu.
- Click the blue cross.
- Edit an item:
- Click the blue pencil.
- Type a Name.
- Type a Description.
- Click Save.
- Click the blue pencil.
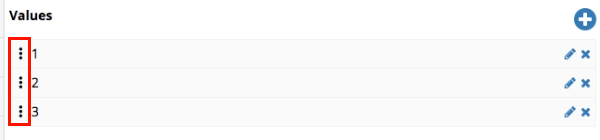
- Sorting drop-down menu fields changes their order in the menu:
- Sort the fields by dragging them by the sort handle (three dots).
- Sort the fields by dragging them by the sort handle
- Delete an item:
- Click the blue X.
- Click the blue X.
- Add an item to the cascading look up field:
- Cascading Selector Mapping: Associate submenu items with the cascading look up items:
- Click Cascading Selector Mapping.
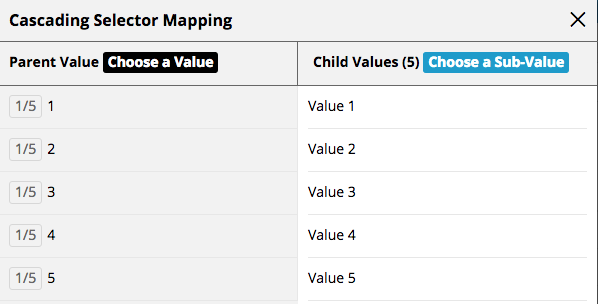
- Click a parent value in the gray left-hand column.
- Click to select the submenu items checkboxes (in the white right-hand column). These items will appear in the submenu when the parent value is selected.
- Repeat for all the values in the left-hand column.
- Click Save & Close.
- Click Save.
- Click Cascading Selector Mapping.
- Create and save a drop-down menu with all the submenu items. (Go to step b. above.)
- DateTime: The date only.
- Click Required if you want the field to show when adding or editing Requirements.
- Select a Default Value if you want a date to appear in the field before any date is selected.
- Select a Value if blank to be saved if no date is entered.
Value if blank is grayed out if the Required checkbox is selected.
- Multi-Select: Select two or more items.
- Click Required if you want the field to show when adding or editing Requirements.
- Default Value: Mark a value as the Default. This step is not mandatory.
- After creating two or more items (see Add an item below) click to select one of them from the Default Value drop-down menu.
- This value will be selected in the menu before any other value is selected.
- Values:
- Add an item to the drop-down menu:
- Click the blue cross.
- Type a Name.
- Type a Description.
- Click Save.
- Repeat to add more items to the multi-select menu.
- Click the blue cross.
- Edit an item:
- Click the blue pencil.
- Type a Name.
- Type a Description.
- Click Save.
- Click the blue pencil.
- Sorting multi-select menu fields changes their order in the menu:
- Sort the fields by dragging them by the sort handle (three dots).
- Sort the fields by dragging them by the sort handle
- Delete an item:
- Click the blue X.
- Click the blue X.
- Add an item to the drop-down menu:
- String: A single line of text. For example, a name.
- Click Save.


Sort Requirements Custom Fields
Sorting Requirements Custom Fields changes the order in which they appear in the Requirements page.
To sort Requirements Custom Fields:
- Click Settings.
- Select a Project from the Select a Project… drop-down menu in the top-left corner.
If you do not select a Project, the Requirements Custom Field will apply to all Projects.
- Click Requirements in the left-hand menu.
- Click Custom Fields.
- Sort the fields by dragging them by the sort handle (three dots) in the left-hand column.


Hide or Unhide a Requirements Custom Field
Hiding a Requirements Custom Field means it will not appear below the Projects drop-down menu when adding or editing a Requirement but it will not be deleted and can be restored.
You can hide a Requirements Custom Field in two ways:
To hide a Requirements Custom Field while adding or editing it (see above):
- Click to unselect the Show in Requirement View checkbox.
Or:
- To hide a Requirements Custom Field on the Requirements Custom Field page:
- Click Settings.
- Locate the Requirements Custom Field:
- If the Requirements Custom Field is associated with all Releases, go to step c.
- If the Requirements Custom Field is associated with a Release, select that Release from the drop-down menu in the top-left corner.
- Click Requirements in the left-hand menu.
- Click Custom Fields.
- Locate the Custom Field’s blue checkbox under the visibility column (which has an eye in the header):
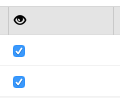
- Hide: Click to unselect the blue checkbox.
- Unhide: Click to select the blue checkbox.
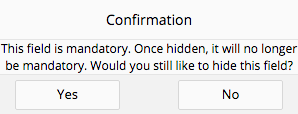
- Click Yes to confirm.
- Click Settings.


Delete a Requirements Custom Field
If you would like to use the Requirements Custom Field again, hide it (see above) instead of deleting it. Deleting cannot be undone.
To delete a Requirements Custom Field:
- Click Settings.
- Locate the Requirements Custom Field:
- If the Requirements Custom Field is associated with all Releases, go to step 3.
- If the Requirements Custom Field is associated with a Release, select that Release from the drop-down menu in the top-left corner.
- Click Requirements in the left-hand menu.
- Click Custom Fields.
- Click the red cross next to the Requirements Custom Field.

![]()