
Features Included in the October 16, 2016 Release
Regional Release Schedule
Functionality Enhancements
![]()
Lock Change records so they cannot be edited!
This means:
- Administrators can prevent completed records from being edited.
- Users editing the same record cannot save over each other’s edits.
- Bulk update will not save over any record currently being edited.
- Bulk delete will not delete any records currently being edited.
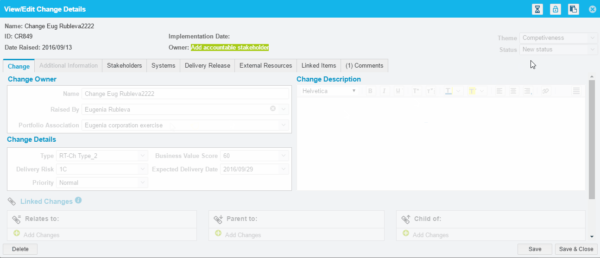
Lock Change records
- Previously, Change records could be edited by any user with the Update Change user permission.
- Two or more users could open and edit a Change record at the same time.
- Running a bulk update could potentially destroy user edits.
- Now, administrators with the new Lock Change user permission can lock or unlock a Change record by:
- Clicking the new padlock button on the top-right corner of the View/Edit Change pop up, beside the hourglass-shaped Audit History button.


- Clicking to select the checkboxes of two or more Changes on the Change page and selecting Bulk Lock or Bulk Unlock from the Action drop-down menu.
- Clicking the new padlock button on the top-right corner of the View/Edit Change pop up, beside the hourglass-shaped Audit History button.
- Locked Change records will be grayed out and cannot be edited.
- Changes will be locked for all users (including the user who locked them) until a user with the Lock Change user permission unlocks them.
- A new column in the Change page will show the lock status of the Change records.
- Email Template Wizard’s Change Entity will have a new trigger, Lock Status Updated, so users can be notified if a Change record’s lock status changes.
- Changes report will have a new column showing whether a Change record is locked or unlocked.
- The Audit History of each Change will record when it has been locked or unlocked.


To see the enhancement, as an administrator:
- Go to Settings
 > User Management.
 - Click Manage Permissions.
- Click the administrator role in the left-hand panel.
- Click to select the Lock Change user permission.
- Click Save & Close.
- Log out of Plutora by selecting Logout from the user menu in the navigation menu.
- Log back into Plutora.
- Go to Release > Change.
- Click a blue-linked ID or Name to open a Change.
- Click the padlock-shaped lock button in the top-right corner to lock the Change.
The Change record will gray out and no longer be editable.
Now it’s easier to use Systems data that has been exported to XLS.
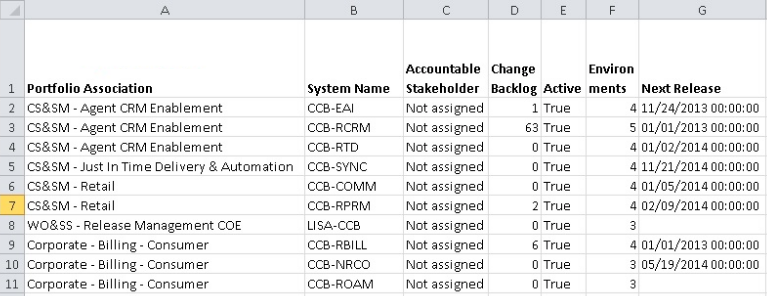
Systems XLS Export Enhancement
- Previously, when exporting Systems data to XLS, it was hard to sort the XLS file because the row that contained the Systems information was not imported on the same row as the Portfolio Association.

- Now, all data rows contain the Portfolio Association, making it easier to sort and use the data.


To use the enhancement:
- Go to Environment > Systems.
- Filter your Systems if you do not want to export all of them.
- Select Export to XLS from the Action drop-down menu.
Your Excel file should start downloading immediately.
Save the file to your hard drive if prompted. - Click to open the XLS file to see the changes.
Filter by multiple items in the Priority or Raised By columns in the Change page and the Change page’s Query Builder.
Combo boxes added to Priority and Raised By Change columns.
- Previously, users could only filter by one Priority or Raised By item at a time using the Change page grid column filter.
- Now, the Changes Priority and Raised By columns have combo boxes instead of drop-down menus.

- Users can select and filter by multiple items at once by clicking to select the checkboxes.
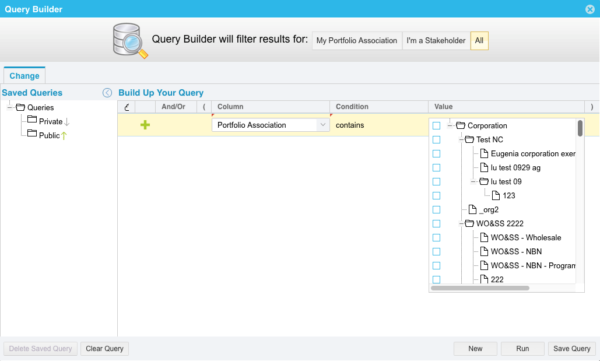
- Change page Query Builder now contains combo boxes instead of drop-down menus for Portfolio Association, Priority, and Raised By, allowing users to filter on multiple parameters at once.


To see the enhancements:
- New combo boxes in the Change page grid column filter:
- Go to Release > Change.
- Click the grid column filter below the Priority and Raised By columns.

- Select two or more checkboxes.
- Press the Enter key to run the filter.
- New combo boxes in the Change page Query Builder:
- Go to Release > Change.
- Click the filter-shaped Query Builder button.

- Select Portfolio Association from the Column drop-down menu.
- Select contains from the Condition drop-down menu.
- Click the Value combo box and select more than one Portfolio Association.
- Click Run.
![]()
Make more TEBR fields mandatory.
TEBR user-defined mandatory fields
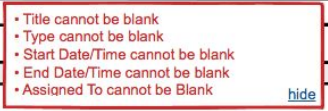
- Previously, only the following TEBR fields in the TEBR pop up (with or without a Release) were mandatory (because they were required by the system):
- Title.
- Start Date/Time.
- End Date/Time.
- Assigned To.
- Now, administrators can use the new TEBR Mandatory Details Customization to make the following fields mandatory too:
- Description.
- Type.
- Status.
- Booking with:
Users must select Booking with before Project/Release or Environment Only become available. This option allows administrators to force users to either book with a Project/Release or with an Environment only.- Project/Release.
- Environment Only.
- Impacted System/Platform.
- Environment Selection.
- If a field marked as mandatory is not entered, the user will receive a red pop up warning telling them that the field cannot be blank.

To see the enhancement:
- Go to Settings > Customization.
- Click TEBR Mandatory Details.
- Click to select a field’s checkbox to make the field mandatory.
Or - Click to deselect a field’s checkbox to make the field non-mandatory.
- Click Submit.
The yellow Your changes have been saved pop up opens and closes.
If you click away from the Customization page without clicking Submit, your changes will not save. - Go to Release Requests > New TEBR to see the new mandatory fields.
Mandatory fields are marked with an asterisk.
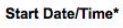
Send TECR and TEBR emails for multiple statuses
TECR and TEBR email template enhancement
- Previously, while creating a TECR or a TEBR email in Email Template Wizard Customization for the Created trigger, users could only create email notifications for TECR or TEBR Type.
- Now, users can select TECR or TEBR Status as well.
- Fine tune your email notifications.
To see the enhancement:
- Go to Settings > Customization.
- Click Email Template Wizard.
- Click Add.
- Click 2 Entity and triggers.
- Select TECR or TEBR from the Entity drop-down menu.
- Select Created from the Trigger drop-down menu.
You will see a new combo box: Send email when TECR status has been changed to.
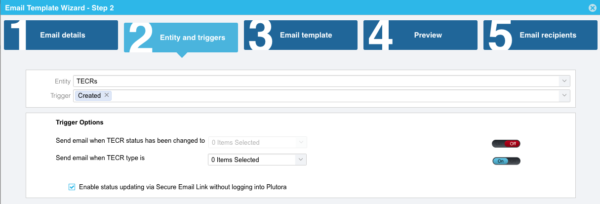
![]()