
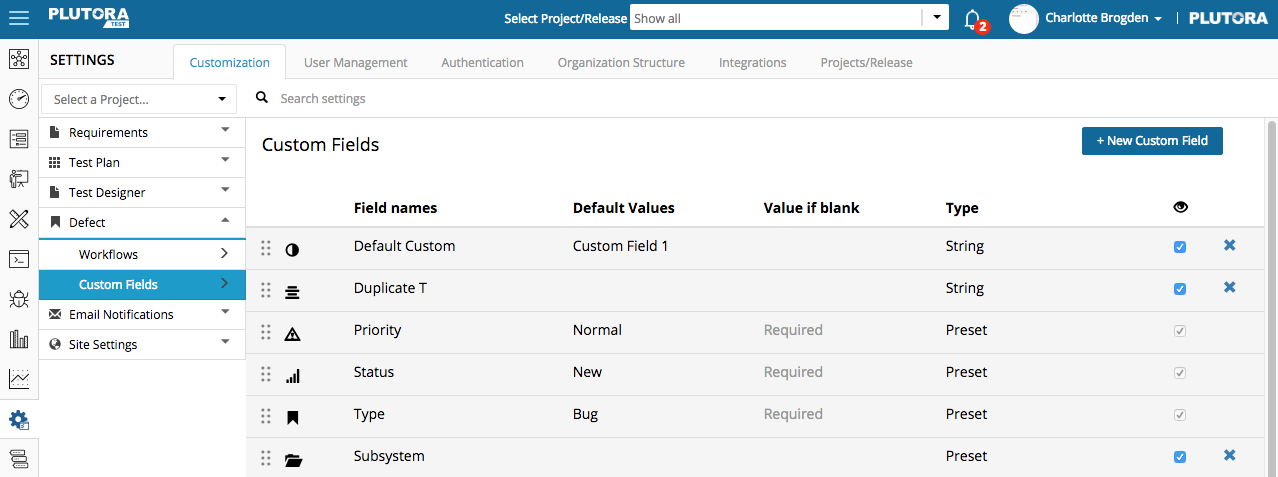
Defect Custom Fields Customization allows users to create their own custom fields and customize the three Defect drop-down menus:
- Type.
- Status.
- Priority.
Location of Defects Custom Fields
To locate Defects Custom Fields:
- Click Defects.

- Locate Defects Custom Fields:
- When adding a new Defect:
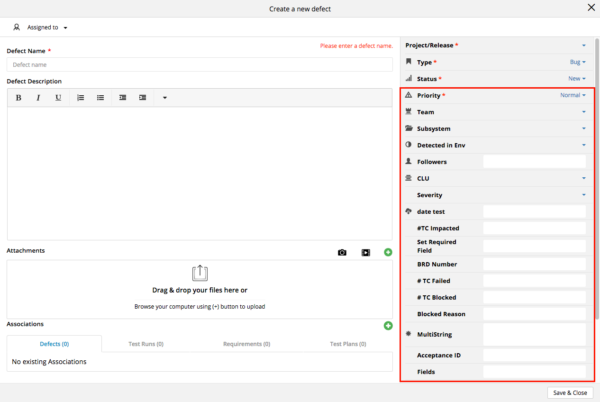
- Click + Add defect.
The Create a new defect pop up opens:- Defects Custom Fields are on the right side of the pop up, under the Project/Release drop-down menu.
- The Type, Status, Priority, and Followers preset fields are located in the same area and may be sorted with the Defects Custom Fields.
- Click + Add defect.
- When editing a Defect:
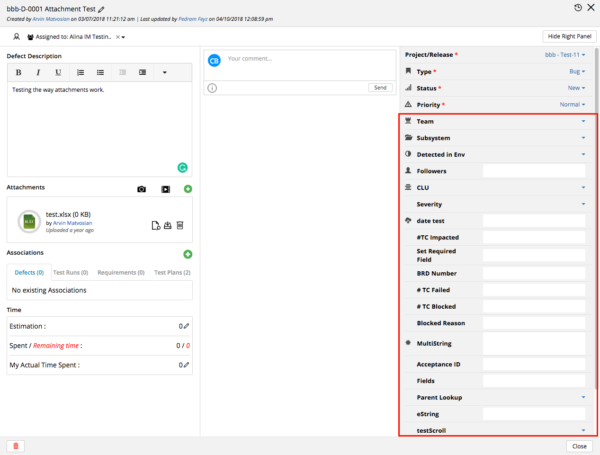
- Click a blue-linked Defect ID or Name.
The edit Defect pop up opens:- Defects Custom Fields are on the right side of the pop up, under the Project/Release drop-down menu.
- The Type, Status, Priority, and Followers preset fields are located in the same area and may be sorted with the Defects Custom Fields.
- Click a blue-linked Defect ID or Name.
- When adding a new Defect:


Add or Edit Type, Status or Priority Custom Fields
Defect Statuses and Types are used in Defect Workflows Customization.
To add or edit a non-user created custom field (Type, Status, or Priority):
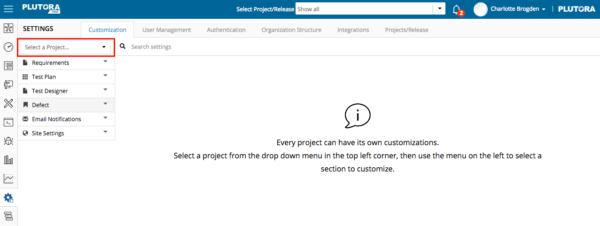
- Click Settings.

- Select a Project from the Select a Project… drop-down menu in the top-left corner.
If you do not select a Project, the Defect Custom Field will apply to all Projects.
- Click Defect in the left-hand menu.
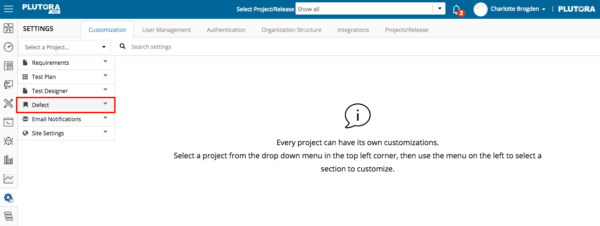
- Click Custom Fields.

- Click the Field name of Type, Status or Priority.
The add and edit pop up opens.
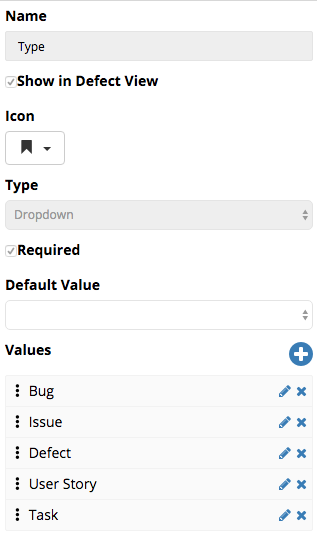
Type, Status or Priority are always required, always have the same name, and are always shown in Defect view, so the Name field, the Show in Defect View checkbox, and the Required checkbox are grayed out. - Click to select an icon to represent the field from the Icon drop-down menu.
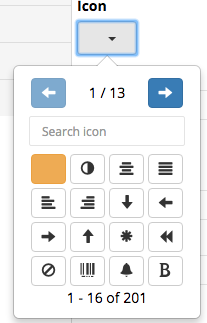
- Click the blue arrows to scroll through the icons.


- Click the blue arrows to scroll through the icons.
- Mark a value as the Default. (This step is not mandatory.)
- After creating two or more items (see Add an item below) click to select one of them from the Default Value drop-down menu.
- This value will appear in the menu before any value is selected.
- After creating two or more items (see Add an item below) click to select one of them from the Default Value drop-down menu.
- Manage Values:
- Add an item to the drop-down menu:
- Click the blue cross.

- Type a Name.
- Type a Description.
- Click Save.
- Repeat i-iv to add more items to the drop-down menu.
- Click the blue cross.
- Edit an item:
- Click the blue pencil.

- Type a Name.
- Type a Description.
- Click Save.
- Click the blue pencil.
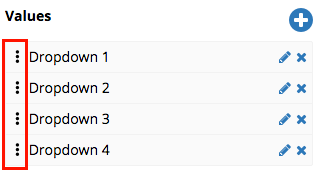
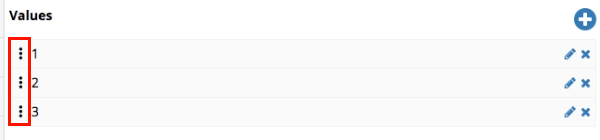
- Sorting drop-down menu fields changes their order in the menu:
- Sort the fields by dragging them by the sort handle
 (three dots).
- Sort the fields by dragging them by the sort handle
- Delete an item:
- Click the blue X.

- Click the blue X.
- Add an item to the drop-down menu:
- Click Save.


Add or Edit a User-Created Defects Custom Field
To add a user-created custom field:
- Click Settings.
- Select a Project from the Select a Project… drop-down menu in the top-left corner.
If you do not select a Project, the user-created Defects Custom Field will apply to all Projects.
- Click Defect in the left-hand menu.
- Click Custom Fields.
- Add a Defect Custom Field: Click + New Custom Field.
Or:
Edit a Defect Custom Field: Click the blue-linked Field Name. - Type a Name. (Mandatory field.)
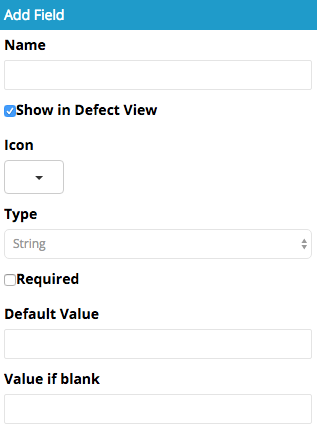
Custom Fields with double quotes ” or square brackets [] in the Value cannot be added to Plutora Analytics workbooks. - Click to select the Show in Defect View checkbox.
The Show in Defect View checkbox hides or unhides the Defect Custom Field’s visibility in the drop-down menu when adding or editing Defects. - Click to select an icon to represent the field from the Icon drop-down menu.
- Click the blue arrows to scroll through the icons.
- Click the blue arrows to scroll through the icons.
- Click to select a field Type:
- String: A single line of text. For example, a name.
- Required checkbox: Click to select if you would like the field to be mandatory.
- Default Value: Type the text that will autofill the field.
- Value if blank: Type the text that will be saved if the field is blank. This field will be grayed out if the Required checkbox is selected.
- Multiline String:
Multiline String fields are text fields that expand to fit their contents.- Required checkbox: Click to select if you would like the field to be mandatory.
- Default Value: Type the text that will autofill the field.
- Value if blank: Type the text that will be saved if the field is blank. This field will be grayed out if the Required checkbox is selected.
- Drop down: A drop-down menu.
- Required checkbox: Click to select if you would like the field to be mandatory.
- Default Value: Mark a value as the Default. This step is not mandatory.
- After creating two or more items (see Add an item below) click to select one of them from the Default Value drop-down menu.
- This value will appear in the menu before any value is selected.
- After creating two or more items (see Add an item below) click to select one of them from the Default Value drop-down menu.
- Values:
- Add an item to the drop-down menu:
- Click the blue cross.
- Type a Name.
- Type a Description.
- Click Save.
- Repeat to add more items to the drop-down menu.
- Click the blue cross.
- Edit an item:
- Click the blue pencil.
- Type a Name.
- Type a Description.
- Click Save.
- Click the blue pencil.
- Sorting drop-down menu fields changes their order in the menu:
- Sort the fields by dragging them by the sort handle (three dots).
- Sort the fields by dragging them by the sort handle
- Delete an item:
- Click the blue X.
- Click the blue X.
- Add an item to the drop-down menu:
- Cascading look up: Selecting from a cascading look up opens another menu with further selections.
- Create and save a drop-down menu with all the submenu items. (Go to step b. above.)
- While creating the drop-down menu:
- Required checkbox: Click to select if you would like the submenu to be mandatory and always visible.
- If Required is unchecked, the submenu will only appear when users select from the main cascading look up.
- Default Value: Mark a value as the Default so that it appears in the drop-down menu before anything is selected. This step is not mandatory.
- While creating the drop-down menu:
- Required checkbox: Click to select if you would like the cascading look up to be mandatory.
- Default Value: Mark a value in the cascading look up as the Default. This step is not mandatory.
- After creating two or more items (see Add an item below) click to select one of them from the Default Value drop-down menu.
- This value will appear in the menu before any value is selected.
- After creating two or more items (see Add an item below) click to select one of them from the Default Value drop-down menu.
- Select a child selector: Click to select the submenu items drop-down menu you created in step i. Do not click Cascading Selector Mapping until you have created Values (see below) or you will have nothing to map.
- Values:
- Add an item to the cascading look up field:
- Click the blue cross.
- Type a Name.
- Type a Description.
- Click Save.
- Repeat I-IV to add more items to the drop-down menu.
- Click the blue cross.
- Edit an item:
- Click the blue pencil.
- Type a Name.
- Type a Description.
- Click Save.
- Click the blue pencil.
- Sorting drop-down menu fields changes their order in the menu:
- Sort the fields by dragging them by the sort handle (three dots).
- Sort the fields by dragging them by the sort handle
- Delete an item:
- Click the blue X.
- Click the blue X.
- Add an item to the cascading look up field:
- Cascading Selector Mapping: Associate submenu items with the cascading look up items:
- Click Cascading Selector Mapping.
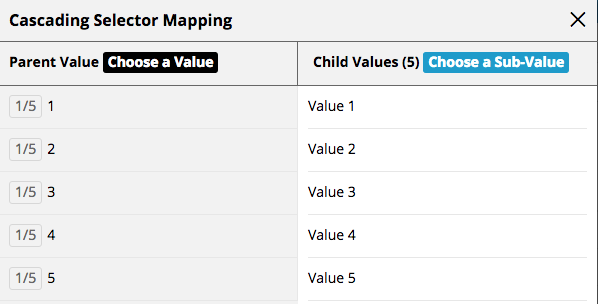
- Click a parent value in the gray left-hand column.
- Click to select the submenu items checkboxes (in the white right-hand column). These items will appear in the submenu when the parent value is selected.
- Repeat for all the values in the left-hand column.
- Click Save & Close.
- Click Save.
- Click Cascading Selector Mapping.
- Create and save a drop-down menu with all the submenu items. (Go to step b. above.)
- DateTime: The date only.
- Click Required if you want the field to show when adding or editing Defects.
- Select a Default Value if you want a date to appear in the field before any date is selected.
- Select a Value if blank to be saved if no date is entered.
Value if blank is grayed out if the Required checkbox is selected.
- Multi-Select: Select two or more items.
- Click Required if you want the field to show when adding or editing Requirements.
- Default Value: Mark a value as the Default. This step is not mandatory.
- After creating two or more items (see Add an item below) click to select one of them from the Default Value drop-down menu.
- This value will be selected in the menu before any other value is selected.
- Values:
- Add an item to the drop-down menu:
- Click the blue cross.
- Type a Name.
- Type a Description.
- Click Save.
- Repeat to add more items to the multi-select menu.
- Click the blue cross.
- Edit an item:
- Click the blue pencil.
- Type a Name.
- Type a Description.
- Click Save.
- Click the blue pencil.
- Sorting multi-select menu fields changes their order in the menu:
- Sort the fields by dragging them by the sort handle (three dots).
- Sort the fields by dragging them by the sort handle
- Delete an item:
- Click the blue X.
- Click the blue X.
- Add an item to the drop-down menu:
- String: A single line of text. For example, a name.
- Click Save.


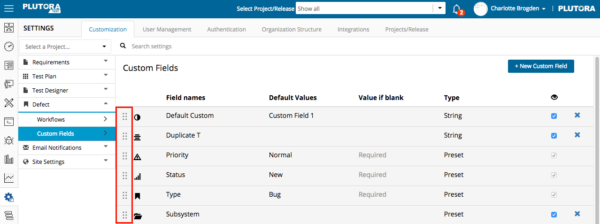
Sort Defects Custom Fields
- Click Settings.
- Select a Project from the Select a Project… drop-down menu in the top-left corner.
If you do not select a Project, the Defect Custom Field will apply to all Projects.
- Click Defect in the left-hand menu.
- Click Custom Fields.
- Sort the fields by dragging them by the sort handle (three dots) in the left-hand column.

Hide or Unhide a Defects Custom Field
Hiding a user-created Defects Custom Field means it will not appear below the Projects drop-down menu when adding or editing a Requirement.
Type, Status and Priority fields cannot be hidden.
You can hide a Defects Custom Field in two ways:
To hide a Defects Custom Field while adding or editing it (see above):
- To hide a Defects Custom Field while adding or editing a Defects Custom Field (see above):
- Click to unselect the Show in Requirement View checkbox.
Or:
- To hide a Defects Custom Field on the Defects Custom Field page:
- Click Settings.
- Locate the Defects Custom Field:
- If the Defects Custom Field is associated with all Releases, go to step c.
- If the Defects Custom Field is associated with a Release, select that Release from the drop-down menu in the top-left corner.
- Click Requirements in the left-hand menu.
- Click Custom Fields.
- Locate the Custom Field’s blue checkbox under the visibility column (which has an eye in the header):
- Hide: Click to unselect the blue checkbox.
- Unhide: Click to select the blue checkbox.
- Click Yes to confirm.
- Click Settings.

Delete a Defects Custom Field
If you would like to use the Defects Custom Field again, hide it (see above) instead of deleting it. Deleting cannot be undone.
Type, Status and Priority fields cannot be deleted.
To delete a Defects Custom Field:
- Click Settings.
- Locate the Defects Custom Field:
- If the Defects Custom Field is associated with all Releases, go to step 3.
- If the Defects Custom Field is associated with a Release, select that Release from the drop-down menu in the top-left corner.
- Click Requirements in the left-hand menu.
- Click Custom Fields.
- Click the red cross next to the Defects Custom Field.

![]()