
Features Included in the November 20, 2016 Release
Regional Release Schedule
Functionality Enhancements
![]()
“As a user, I have hundreds of pieces of information to input into Plutora every day. Now that the performance enhancements are in place, I can enter them in half the time.”
Performance Enhancements
The following performance enhancements are provided for every page on Plutora:
- Page load times: Pages now load much faster than before.
- Site start time: Plutora will now load much faster due to better cookie management and Data Access Layer enhancements.

“I don’t want to click multiple tabs to enter information. Putting the Details and Additional Information tabs together makes me more productive.”
Change User Interface (UI) Redesign
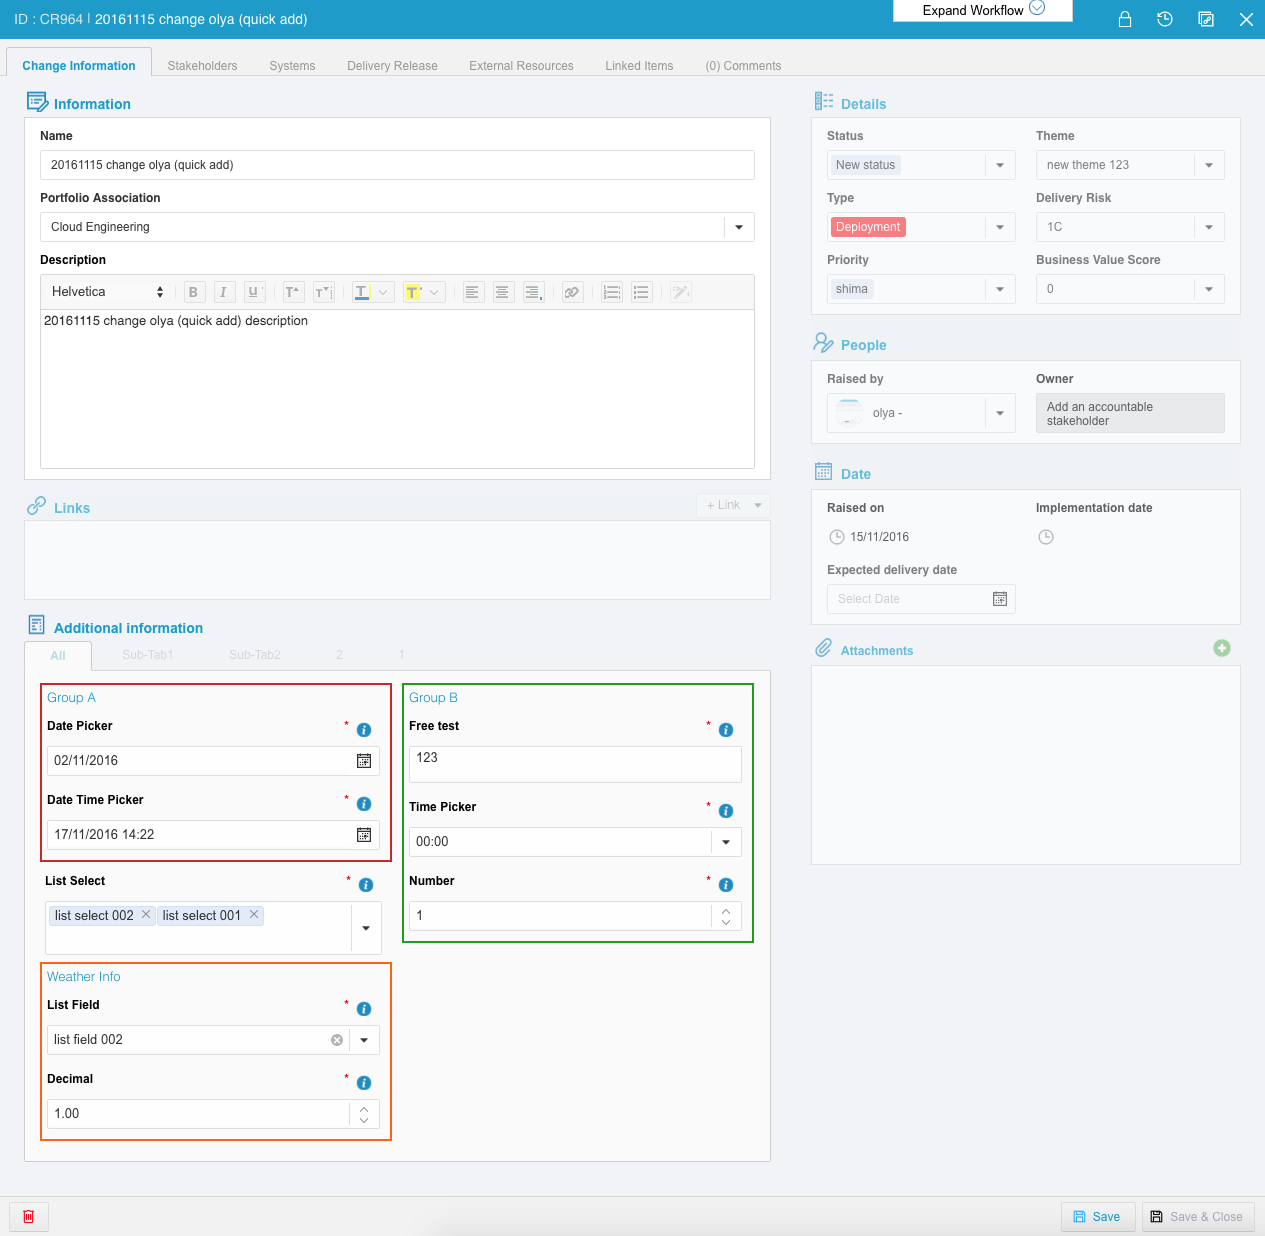
- Previously, the Change pop up resembled the rest of Plutora.
- Now, users going to Release > Change and adding or editing a Change will notice:
- There are fewer tabs to click through – the Details tab and Additional Information tabs have been merged into a single tab called Change Information.
- All the Additional Information sub tabs are in the Additional Information panel.
- Additional Information groups and fields are under the Additional Information sub tabs and are arranged in two columns.
- The Audit History
 and Copy URL to Clipboard
  buttons have been redesigned.
- There are fewer tabs to click through – the Details tab and Additional Information tabs have been merged into a single tab called Change Information.
“My RAG Traffic Lights can now be controlled from Release Manager, which makes sense because that is where they appear. I can even hide the Traffic Lights altogether if I don’t need them.”
Disable RAG Traffic Lights
- Previously, the RAG Traffic Light and Release Highlight settings were in the user menu in the blue navigation menu.
- Now, both settings have been moved to the Release Manager, into the new, cogwheel-shaped Release Grid User Setting menu.

To use the new feature:
- Go to Releases > Release Manager.
- Click the cogwheel-shaped Release Grid User Setting menu.

- Click the RAG status (Traffic Lights) drop-down menu and select one of the following:
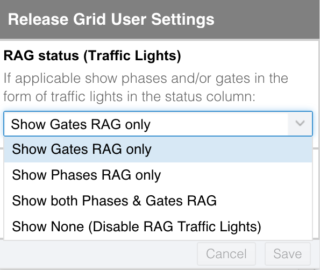
- Show Gates RAG only: Show only the Gates belonging to the Release as Traffic Lights.
- Show Phases RAG only: Show only the Phases belonging to the Release as Traffic Lights.
- Show both Phases & Gates RAG: Show both Phases and Gates.
- Show None (Disable RAG Traffic Lights): The default setting for new users. Show only the Status in the Status column. Do not show any Traffic Lights.
- Click the Late Release Highlighting drop-down menu and select one of the following:
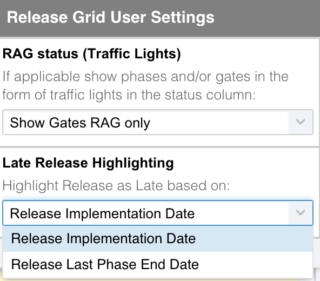
- Release Implementation Date: The Release will turn red in Release Manager after the Release Implementation Date has passed.
- Release Last Phase End Date: The Release will turn red in Release Manager after the end date of the last Phase belonging to the Release has passed. (See the screenshot below.)

- Click Save.


“I can now email links to my Releases to all the people who need to see them, and they don’t even have to be logged in.”
Releases: Copy URL Button
- Previously, users could not follow a link and open a Release.
- Now, users can click the Copy URL to Clipboard
 button at the top right of the Enterprise, Project and Independent Release pop ups and paste the Release’s URL into any application, document or email.
 - Clicking on the link will take users straight to the record.
“Insights Dashboard brings all my delivery metrics together and now shows me Defect Descriptions and more!”
Insights Dashboard enhancements
- Now, Insights Dashboard has four new features:
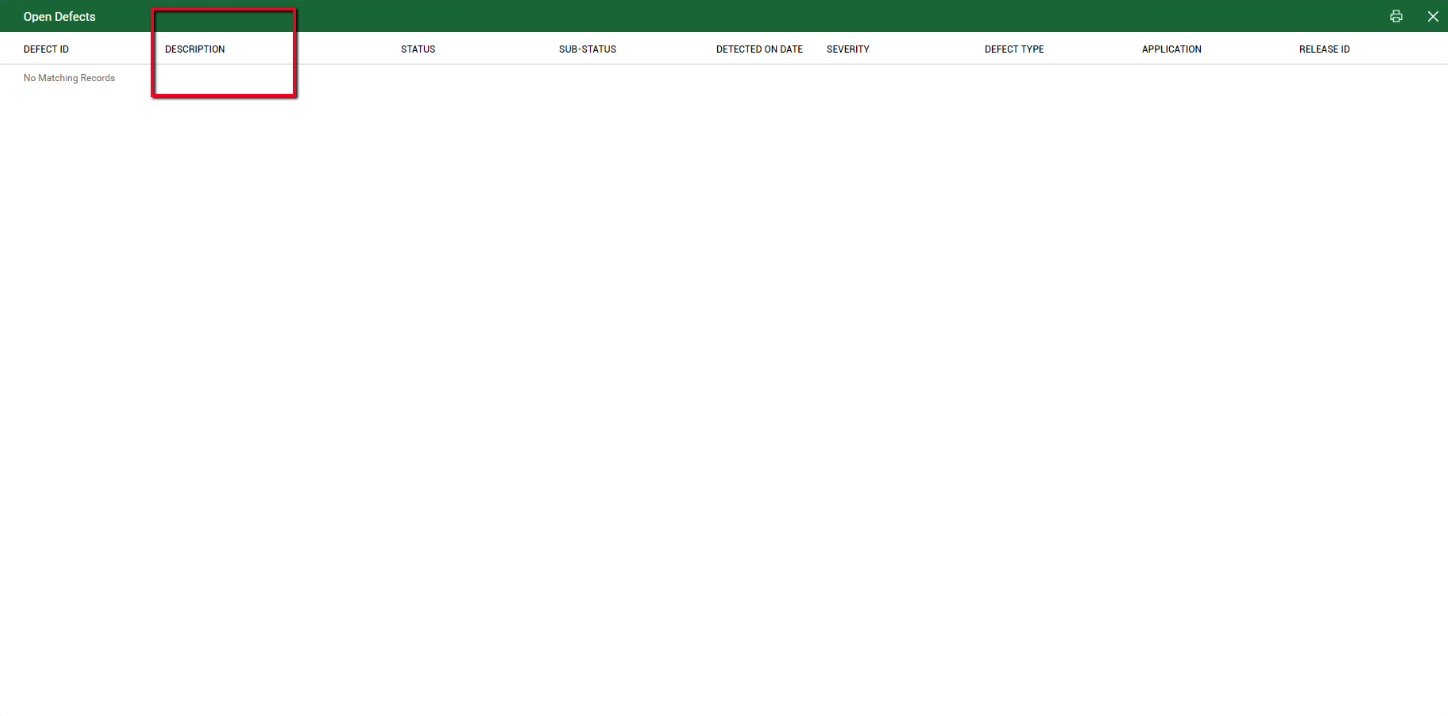
- Open Defects pop up has a new column: Description, which brings more context and information to the Defect:
Dashboard > Insights > Click under the Open Defects column.

- Activity Summary and Progress pop up now has an All tab, which displays all the Activities and Criteria in the Release as well as a total count of Activities:
Dashboard > Insights > Click a Harvey Ball with a percentage under the Activities Summary & Progress column.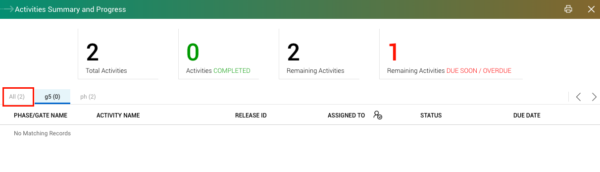
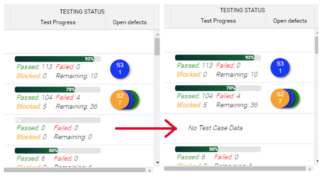
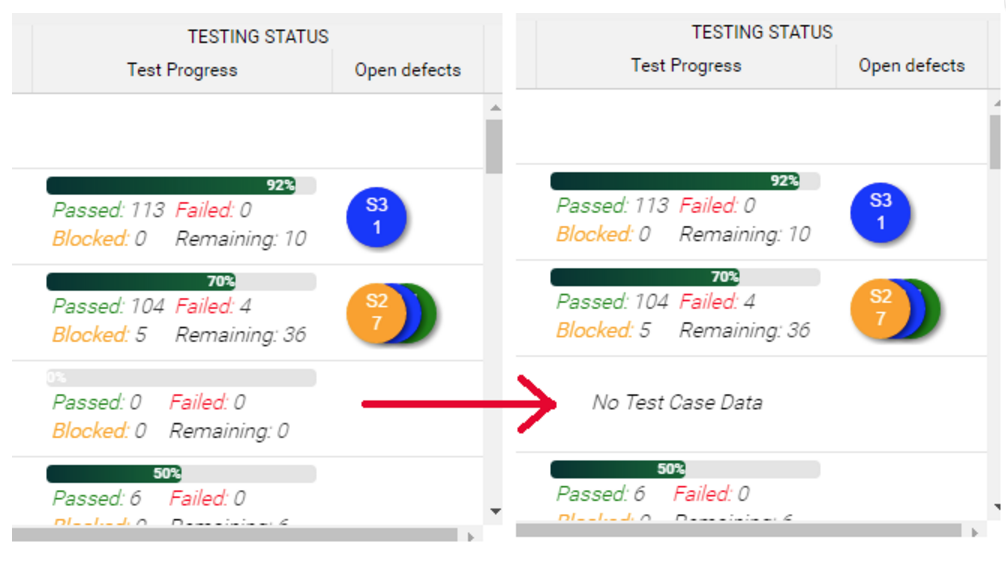
- Test Progress column now displays “No Test Case Data” instead of zeroes:
Dashboard > Insights > Look at the Test Progress column.
- Test Progress pop up has a new column: Test Set Name:
Dashboard > Insights > Click under the Test Progress column.

- Open Defects pop up has a new column: Description, which brings more context and information to the Defect:


![]()
“Dragging and dropping the same old Environments takes time. Now that I can link all the Environments I use, I can book a parent Environment and its child and grandchild Environments with a single drag and drop.”
Linked Environments
- Previously, Environments could only be booked individually or as an Environment Group.
- Now, Environments can be linked to each other as parent, child, or grandchild Environments.
- Booking a parent Environment books its child and grandchild Environments too.
To book Environments in a single drag and drop:
- Go to the new Environment Setup customization page:
Settings > Environments > Environment Setup.
 - Click to select the Enabled checkbox.
- Click Submit.
- Link Environments:
- Go to Environment > Manager.
- Click on an Environment’s blue-linked Name to open the Environment.
- Click the Details tab.
The Parent to: and Child of: boxes are found halfway down on the left-hand side.
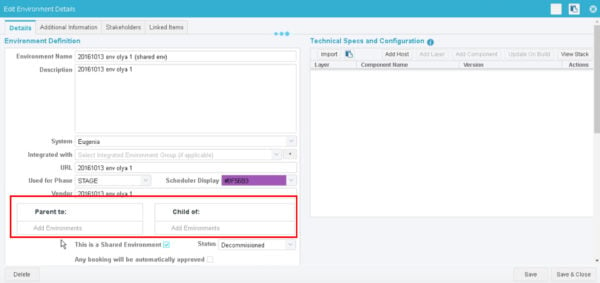
- Click the green cross in one of the boxes.

- Select one or more Environments by clicking to select the checkboxes.
- Click Save & Close.
- Book Linked Environments with a single drag and drop:
- On the TEBR pop up (with or without a Release):
Environment > Requests > New TEBR
or
Environments > Environment Requests > TEBR tab > Click to open a TEBR - On the on the View/Edit Release pop up for Enterprise, Project and Independent Releases:
Releases > Release Manager > Add Enterprise Release > Environments tab
or
Releases > Release Manager > Add New > Project or Independent > Environments tab
or
Releases > Release Manager > Click to open a Release > Environments tab
- On the TEBR pop up (with or without a Release):
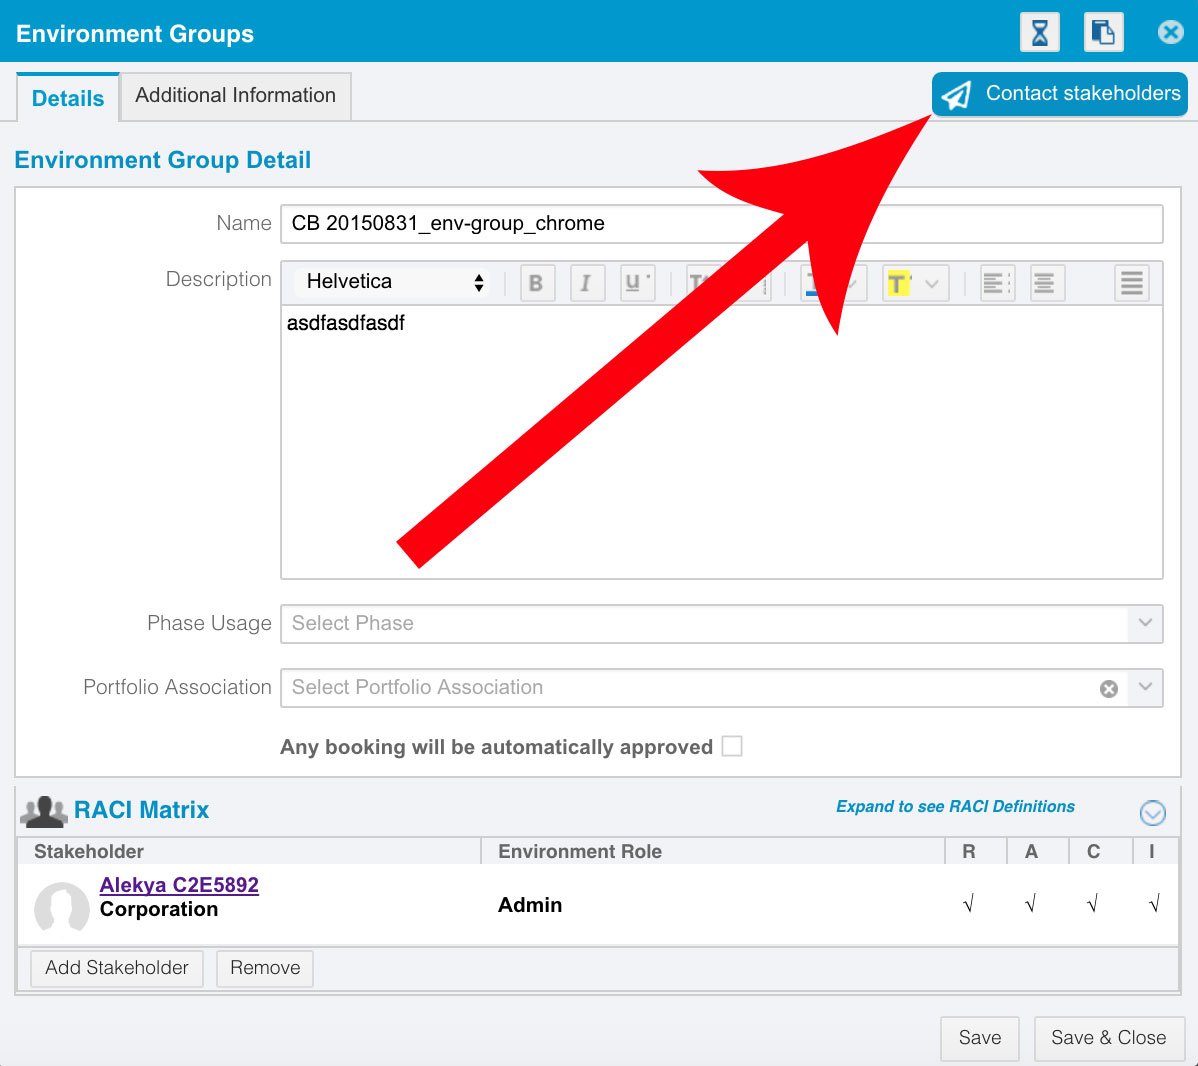
“Users will no longer be left in the dark about Environment problems. Depending on where I click the new Contact Stakeholders button, I can warn not only the broken Environment’s Stakeholders but the Stakeholders of every Environment in the same System and the entire Environment Group as well.”
Contact Stakeholders Button
- Previously, if an Environment was experiencing problems, users had to manually contact Stakeholders.
- Now, users can:
- Contact the Stakeholders of a single Environment:
- By clicking Contact Stakeholders on the Edit Environment Details pop up:
Environment > Manager > Click a blue-linked Environment Name
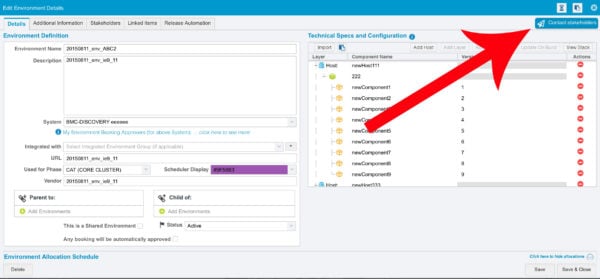
- By clicking Contact Stakeholders on the Edit Environment Details pop up:
- Contact the Stakeholders of an entire Environment Group:
- By clicking Contact Stakeholders on the Environment Group pop up:
Environment > Groups > Click one of the Details buttons

- By clicking Contact Stakeholders on the Environment Group pop up:
- Contact the Stakeholders of every Environment in a System and the Environment Groups of every Environment in that System:
- By clicking Contact Stakeholders on the View/Edit Systems pop up:
Environment > Systems > Click a blue-linked System Name.

- By clicking Contact Stakeholders on the View/Edit Systems pop up:
“It’s important for us to see the vendors associated with each of our Systems. With the new vendor column on the Systems page and on Systems XLS export, now we can.”
Vendor column
- Previously, Vendors could be added to Systems as a free-text field but the data was not used.
- Now, your Vendor data can appear as a Vendor column on the Systems page and while exporting Systems XLS data.
- The Vendor column is hidden by default.
To show the Vendor column:
- Hover your mouse cursor over the right-hand side of a header until the header menu button appears.

- Click the header menu button and select Columns.
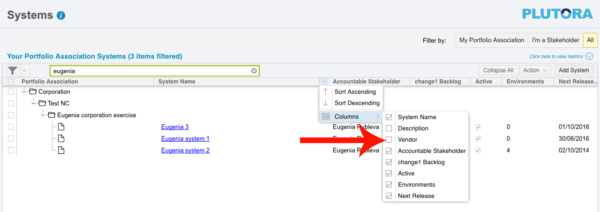
- Click to select the Vendor checkbox.
![]()